Introduction
Spock is a testing and specification framework for Java and Groovy applications. What makes it stand out from the crowd is its beautiful and highly expressive specification language. Thanks to its JUnit runner, Spock is compatible with most IDEs, build tools, and continuous integration servers. Spock is inspired from JUnit, jMock, RSpec, Groovy, Scala, Vulcans, and other fascinating life forms.
Getting Started
It’s really easy to get started with Spock. This section shows you how.
Spock Web Console
Spock Web Console is a website that allows you to instantly view, edit, run, and even publish Spock specifications. It is the perfect place to toy around with Spock without making any commitments. So why not run Hello, Spock! right away?
Spock Example Project
To try Spock in your local environment, clone or download/unzip the Spock Example Project. It comes with fully working Ant, Gradle, and Maven builds that require no further setup. The Gradle build even bootstraps Gradle itself and gets you up and running in Eclipse or IDEA with a single command. See the README for detailed instructions.
Spock Primer
This chapter assumes that you have a basic knowledge of Groovy and unit testing. If you are a Java developer but haven’t heard about Groovy, don’t worry - Groovy will feel very familiar to you! In fact, one of Groovy’s main design goals is to be the scripting language alongside Java. So just follow along and consult the Groovy documentation whenever you feel like it.
The goals of this chapter are to teach you enough Spock to write real-world Spock specifications, and to whet your appetite for more.
To learn more about Groovy, go to http://groovy-lang.org/.
To learn more about unit testing, go to http://en.wikipedia.org/wiki/Unit_testing.
Terminology
Let’s start with a few definitions: Spock lets you write specifications that describe expected features (properties, aspects) exhibited by a system of interest. The system of interest could be anything between a single class and a whole application, and is also called the system under specification or SUS. The description of a feature starts from a specific snapshot of the SUS and its collaborators; this snapshot is called the feature’s fixture.
The following sections walk you through all building blocks of which a Spock specification may be composed. A typical specification uses only a subset of them.
Imports
import spock.lang.*Package spock.lang contains the most important types for writing specifications.
Specification
class MyFirstSpecification extends Specification {
  // fields
  // fixture methods
  // feature methods
  // helper methods
}
A specification is represented as a Groovy class that extends from spock.lang.Specification. The name of a specification
usually relates to the system or system operation described by the specification. For example, CustomerSpec,
H264VideoPlayback, and ASpaceshipAttackedFromTwoSides are all reasonable names for a specification.
Class Specification contains a number of useful methods for writing specifications. Furthermore it instructs JUnit to
run specification with Sputnik, Spock’s JUnit runner. Thanks to Sputnik, Spock specifications can be run by most modern
Java IDEs and build tools.
Fields
def obj = new ClassUnderSpecification()
def coll = new Collaborator()
Instance fields are a good place to store objects belonging to the specification’s fixture. It is good practice to
initialize them right at the point of declaration. (Semantically, this is equivalent to initializing them at the very
beginning of the setup() method.) Objects stored into instance fields are not shared between feature methods.
Instead, every feature method gets its own object. This helps to isolate feature methods from each other, which is often
a desirable goal.
@Shared res = new VeryExpensiveResource()Sometimes you need to share an object between feature methods. For example, the object might be very expensive to create,
or you might want your feature methods to interact with each other. To achieve this, declare a @Shared field. Again
it’s best to initialize the field right at the point of declaration. (Semantically, this is equivalent to initializing
the field at the very beginning of the setupSpec() method.)
static final PI = 3.141592654Static fields should only be used for constants. Otherwise shared fields are preferable, because their semantics with respect to sharing are more well-defined.
Fixture Methods
def setupSpec() {}    // runs once -  before the first feature method
def setup() {}        // runs before every feature method
def cleanup() {}      // runs after every feature method
def cleanupSpec() {}  // runs once -  after the last feature method
Fixture methods are responsible for setting up and cleaning up the environment in which feature methods are run.
Usually it’s a good idea to use a fresh fixture for every feature method, which is what the setup() and cleanup() methods are for.
All fixture methods are optional.
Occasionally it makes sense for feature methods to share a fixture, which is achieved by using shared
fields together with the setupSpec() and cleanupSpec() methods.
Note that setupSpec() and cleanupSpec() may not reference instance fields unless they are annotated with @Shared.
Invocation Order
If fixture methods are overridden in a specification subclass then setup() of the superclass will run before setup() of the subclass.
cleanup() works in reverse order, that is cleanup() of the subclass will execute before cleanup() of the superclass.
setupSpec() and cleanupSpec() behave in the same way.
There is no need to explicitly call super.setup() or super.cleanup() as Spock will automatically find and execute fixture methods at all levels in an inheritance hierarchy.
-
super.setupSpec -
sub.setupSpec -
super.setup -
sub.setup -
feature method
-
sub.cleanup -
super.cleanup -
sub.cleanupSpec -
super.cleanupSpec
Feature Methods
def "pushing an element on the stack"() {
  // blocks go here
}
Feature methods are the heart of a specification. They describe the features (properties, aspects) that you expect to find in the system under specification. By convention, feature methods are named with String literals. Try to choose good names for your feature methods, and feel free to use any characters you like!
Conceptually, a feature method consists of four phases:
-
Set up the feature’s fixture
-
Provide a stimulus to the system under specification
-
Describe the response expected from the system
-
Clean up the feature’s fixture
Whereas the first and last phases are optional, the stimulus and response phases are always present (except in interacting feature methods), and may occur more than once.
Blocks
Spock has built-in support for implementing each of the conceptual phases of a feature method. To this end, feature
methods are structured into so-called blocks. Blocks start with a label, and extend to the beginning of the next block,
or the end of the method. There are six kinds of blocks: given, when, then, expect, cleanup, and where blocks.
Any statements between the beginning of the method and the first explicit block belong to an implicit given block.
A feature method must have at least one explicit (i.e. labelled) block - in fact, the presence of an explicit block is what makes a method a feature method. Blocks divide a method into distinct sections, and cannot be nested.
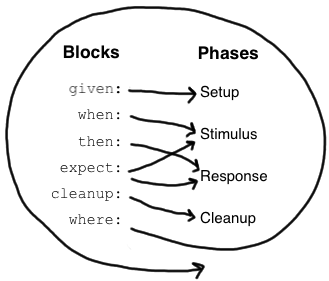
The picture on the right shows how blocks map to the conceptual phases of a feature method. The where block has a
special role, which will be revealed shortly. But first, let’s have a closer look at the other blocks.
Given Blocks
given:
def stack = new Stack()
def elem = "push me"
The given block is where you do any setup work for the feature that you are describing. It may not be preceded by
other blocks, and may not be repeated. A given block doesn’t have any special semantics. The given: label is
optional and may be omitted, resulting in an implicit given block. Originally, the alias setup: was the preferred block name,
but using given: often leads to a more readable feature method description (see Specifications as Documentation).
When and Then Blocks
when:   // stimulus
then:   // response
The when and then blocks always occur together. They describe a stimulus and the expected response. Whereas when
blocks may contain arbitrary code, then blocks are restricted to conditions, exception conditions, interactions,
and variable definitions. A feature method may contain multiple pairs of when-then blocks.
Conditions
Conditions describe an expected state, much like JUnit’s assertions. However, conditions are written as plain boolean expressions, eliminating the need for an assertion API. (More precisely, a condition may also produce a non-boolean value, which will then be evaluated according to Groovy truth.) Let’s see some conditions in action:
when:
stack.push(elem)

then:
!stack.empty
stack.size() == 1
stack.peek() == elem|
Tip
|
Try to keep the number of conditions per feature method small. One to five conditions is a good guideline. If you have more than that, ask yourself if you are specifying multiple unrelated features at once. If the answer is yes, break up the feature method in several smaller ones. If your conditions only differ in their values, consider using a data table. |
What kind of feedback does Spock provide if a condition is violated? Let’s try and change the second condition to
stack.size() == 2. Here is what we get:
Condition not satisfied:

stack.size() == 2
|     |      |
|     1      false
[push me]
As you can see, Spock captures all values produced during the evaluation of a condition, and presents them in an easily digestible form. Nice, isn’t it?
Implicit and explicit conditions
Conditions are an essential ingredient of then blocks and expect blocks. Except for calls to void methods and
expressions classified as interactions, all top-level expressions in these blocks are implicitly treated as conditions.
To use conditions in other places, you need to designate them with Groovy’s assert keyword:
def setup() {
  stack = new Stack()
  assert stack.empty
}
If an explicit condition is violated, it will produce the same nice diagnostic message as an implicit condition.
Exception Conditions
Exception conditions are used to describe that a when block should throw an exception. They are defined using the
thrown() method, passing along the expected exception type. For example, to describe that popping from an empty stack
should throw an EmptyStackException, you could write the following:
when:
stack.pop()

then:
thrown(EmptyStackException)
stack.empty
As you can see, exception conditions may be followed by other conditions (and even other blocks). This is particularly useful for specifying the expected content of an exception. To access the exception, first bind it to a variable:
when:
stack.pop()

then:
def e = thrown(EmptyStackException)
e.cause == null
Alternatively, you may use a slight variation of the above syntax:
when:
stack.pop()

then:
EmptyStackException e = thrown()
e.cause == null
This syntax has two small advantages: First, the exception variable is strongly typed, making it easier for IDEs to
offer code completion. Second, the condition reads a bit more like a sentence ("then an EmptyStackException is thrown").
Note that if no exception type is passed to the thrown() method, it is inferred from the variable type on the left-hand
side.
Sometimes we need to convey that an exception should not be thrown. For example, let’s try to express that a HashMap
should accept a null key:
def "HashMap accepts null key"() {
  setup:
  def map = new HashMap()
  map.put(null, "elem")
}
This works but doesn’t reveal the intention of the code. Did someone just leave the building before he had finished implementing this method? After all, where are the conditions? Fortunately, we can do better:
def "HashMap accepts null key"() {
  given:
  def map = new HashMap()

  when:
  map.put(null, "elem")

  then:
  notThrown(NullPointerException)
}
By using notThrown(), we make it clear that in particular a NullPointerException should not be thrown. (As per the
contract of Map.put(), this would be the right thing to do for a map that doesn’t support null keys.) However,
the method will also fail if any other exception is thrown.
Interactions
Whereas conditions describe an object’s state, interactions describe how objects communicate with each other. Interactions and Interaction based testing are described in a separate chapter, so we only give a quick example here. Suppose we want to describe the flow of events from a publisher to its subscribers. Here is the code:
def "events are published to all subscribers"() {
  given:
  def subscriber1 = Mock(Subscriber)
  def subscriber2 = Mock(Subscriber)
  def publisher = new Publisher()
  publisher.add(subscriber1)
  publisher.add(subscriber2)

  when:
  publisher.fire("event")

  then:
  1 * subscriber1.receive("event")
  1 * subscriber2.receive("event")
}
Expect Blocks
An expect block is more limited than a then block in that it may only contain conditions and variable definitions.
It is useful in situations where it is more natural to describe stimulus and expected response in a single expression.
For example, compare the following two attempts to describe the Math.max() method:
when:
def x = Math.max(1, 2)

then:
x == 2expect:
Math.max(1, 2) == 2Although both snippets are semantically equivalent, the second one is clearly preferable. As a guideline, use when-then
to describe methods with side effects, and expect to describe purely functional methods.
|
Tip
|
Leverage Groovy JDK methods like any() and every()
to create more expressive and succinct conditions.
|
Cleanup Blocks
given:
def file = new File("/some/path")
file.createNewFile()

// ...

cleanup:
file.delete()
A cleanup block may only be followed by a where block, and may not be repeated. Like a cleanup method, it is used
to free any resources used by a feature method, and is run even if (a previous part of) the feature method has produced
an exception. As a consequence, a cleanup block must be coded defensively; in the worst case, it must gracefully
handle the situation where the first statement in a feature method has thrown an exception, and all local variables
still have their default values.
|
Tip
|
Groovy’s safe dereference operator (foo?.bar()) simplifies writing defensive code.
|
Object-level specifications usually don’t need a cleanup method, as the only resource they consume is memory, which
is automatically reclaimed by the garbage collector. More coarse-grained specifications, however, might use a cleanup
block to clean up the file system, close a database connection, or shut down a network service.
|
Tip
|
If a specification is designed in such a way that all its feature methods require the same resources, use a
cleanup() method; otherwise, prefer cleanup blocks. The same trade-off applies to setup() methods and given blocks.
|
Where Blocks
A where block always comes last in a method, and may not be repeated. It is used to write data-driven feature methods.
To give you an idea how this is done, have a look at the following example:
def "computing the maximum of two numbers"() {
  expect:
  Math.max(a, b) == c

  where:
  a << [5, 3]
  b << [1, 9]
  c << [5, 9]
}
This where block effectively creates two "versions" of the feature method: One where a is 5, b is 1, and c is 5,
and another one where a is 3, b is 9, and c is 9.
Although it is declared last, the where block is evaluated before the feature method containing it runs.
The where block is further explained in the Data Driven Testing chapter.
Helper Methods
Sometimes feature methods grow large and/or contain lots of duplicated code. In such cases it can make sense to introduce one or more helper methods. Two good candidates for helper methods are setup/cleanup logic and complex conditions. Factoring out the former is straightforward, so let’s have a look at conditions:
def "offered PC matches preferred configuration"() {
  when:
  def pc = shop.buyPc()

  then:
  pc.vendor == "Sunny"
  pc.clockRate >= 2333
  pc.ram >= 4096
  pc.os == "Linux"
}
If you happen to be a computer geek, your preferred PC configuration might be very detailed, or you might want to compare offers from many different shops. Therefore, let’s factor out the conditions:
def "offered PC matches preferred configuration"() {
  when:
  def pc = shop.buyPc()

  then:
  matchesPreferredConfiguration(pc)
}

def matchesPreferredConfiguration(pc) {
  pc.vendor == "Sunny"
  && pc.clockRate >= 2333
  && pc.ram >= 4096
  && pc.os == "Linux"
}
The new helper method matchesPreferredConfiguration() consists of a single boolean expression whose result is returned.
(The return keyword is optional in Groovy.) This is fine except for the way that an inadequate offer is now presented:
Condition not satisfied:

matchesPreferredConfiguration(pc)
|                             |
false                         ...
Not very helpful. Fortunately, we can do better:
void matchesPreferredConfiguration(pc) {
  assert pc.vendor == "Sunny"
  assert pc.clockRate >= 2333
  assert pc.ram >= 4096
  assert pc.os == "Linux"
}
When factoring out conditions into a helper method, two points need to be considered: First, implicit conditions must
be turned into explicit conditions with the assert keyword. Second, the helper method must have return type void.
Otherwise, Spock might interpret the return value as a failing condition, which is not what we want.
As expected, the improved helper method tells us exactly what’s wrong:
Condition not satisfied:

assert pc.clockRate >= 2333
       |  |         |
       |  1666      false
       ...
A final advice: Although code reuse is generally a good thing, don’t take it too far. Be aware that the use of fixture and helper methods can increase the coupling between feature methods. If you reuse too much or the wrong code, you will end up with specifications that are fragile and hard to evolve.
Using with for expectations
As an alternative to the above helper methods, you can use a with(target, closure) method to interact on the object being verified.
This is especially useful in then and expect blocks.
def "offered PC matches preferred configuration"() {
  when:
  def pc = shop.buyPc()

  then:
  with(pc) {
    vendor == "Sunny"
    clockRate >= 2333
    ram >= 406
    os == "Linux"
  }
}
Unlike when you use helper methods, there is no need for explicit assert statements for proper error reporting.
When verifying mocks, a with statement can also cut out verbose verification statements.
def service = Mock(Service) // has start(), stop(), and doWork() methods
def app = new Application(service) // controls the lifecycle of the service

when:
app.run()

then:
with(service) {
  1 * start()
  1 * doWork()
  1 * stop()
}
Sometimes an IDE as trouble to determine the type of the target, in that case you can help out by manually specifying the
target type via with(target, type, closure).
Using verifyAll to assert multiple expectations together
Normal expectations fail the test on the first failed assertions. Sometimes it is helpful to collect these failures before failing the test to have more information, this behavior is also known as soft assertions.
The verifyAll method can be used like with,
def "offered PC matches preferred configuration"() {
  when:
  def pc = shop.buyPc()

  then:
  verifyAll(pc) {
    vendor == "Sunny"
    clockRate >= 2333
    ram >= 406
    os == "Linux"
  }
}
or it can be used without a target.
  expect:
  verifyAll {
    2 == 2
    4 == 4
  }
Like with you can also optionally define a type hint for the IDE.
Specifications as Documentation
Well-written specifications are a valuable source of information. Especially for higher-level specifications targeting a wider audience than just developers (architects, domain experts, customers, etc.), it makes sense to provide more information in natural language than just the names of specifications and features. Therefore, Spock provides a way to attach textual descriptions to blocks:
given: "open a database connection"
// code goes here
Use the and: label to describe logically different parts of a block:
given: "open a database connection"
// code goes here

and: "seed the customer table"
// code goes here

and: "seed the product table"
// code goes here
An and: label followed by a description can be inserted at any (top-level) position of a feature method, without
altering the method’s semantics.
In Behavior Driven Development, customer-facing features (called stories) are described in a given-when-then format.
Spock directly supports this style of specification with the given: label:
given: "an empty bank account"
// ...

when: "the account is credited $10"
// ...

then: "the account's balance is $10"
// ...
Block descriptions are not only present in source code, but are also available to the Spock runtime. Planned usages of block descriptions are enhanced diagnostic messages, and textual reports that are equally understood by all stakeholders.
Extensions
As we have seen, Spock offers lots of functionality for writing specifications. However, there always comes a time when something else is needed. Therefore, Spock provides an interception-based extension mechanism. Extensions are activated by annotations called directives. Currently, Spock ships with the following directives:
@Timeout
|
Sets a timeout for execution of a feature or fixture method. |
@Ignore
|
Ignores any feature method carrying this annotation. |
@IgnoreRest
|
Any feature method carrying this annotation will be executed, all others will be ignored. Useful for quickly running just a single method. |
@FailsWith
|
Expects a feature method to complete abruptly. |
Go to the Extensions chapter to learn how to implement your own directives and extensions.
Comparison to JUnit
Although Spock uses a different terminology, many of its concepts and features are inspired by JUnit. Here is a rough comparison:
| Spock | JUnit |
|---|---|
Specification |
Test class |
|
|
|
|
|
|
|
|
Feature |
Test |
Feature method |
Test method |
Data-driven feature |
Theory |
Condition |
Assertion |
Exception condition |
|
Interaction |
Mock expectation (e.g. in Mockito) |
`
Data Driven Testing
Oftentimes, it is useful to exercise the same test code multiple times, with varying inputs and expected results. Spock’s data driven testing support makes this a first class feature.
Introduction
Suppose we want to specify the behavior of the Math.max method:
class MathSpec extends Specification {
  def "maximum of two numbers"() {
    expect:
    // exercise math method for a few different inputs
    Math.max(1, 3) == 3
    Math.max(7, 4) == 7
    Math.max(0, 0) == 0
  }
}
Although this approach is fine in simple cases like this one, it has some potential drawbacks:
-
Code and data are mixed and cannot easily be changed independently
-
Data cannot easily be auto-generated or fetched from external sources
-
In order to exercise the same code multiple times, it either has to be duplicated or extracted into a separate method
-
In case of a failure, it may not be immediately clear which inputs caused the failure
-
Exercising the same code multiple times does not benefit from the same isolation as executing separate methods does
Spock’s data-driven testing support tries to address these concerns. To get started, let’s refactor above code into a data-driven feature method. First, we introduce three method parameters (called data variables) that replace the hard-coded integer values:
class MathSpec extends Specification {
  def "maximum of two numbers"(int a, int b, int c) {
    expect:
    Math.max(a, b) == c
    ...
  }
}
We have finished the test logic, but still need to supply the data values to be used. This is done in a where: block,
which always comes at the end of the method. In the simplest (and most common) case, the where: block holds a data table.
Data Tables
Data tables are a convenient way to exercise a feature method with a fixed set of data values:
class MathSpec extends Specification {
  def "maximum of two numbers"(int a, int b, int c) {
    expect:
    Math.max(a, b) == c

    where:
    a | b | c
    1 | 3 | 3
    7 | 4 | 7
    0 | 0 | 0
  }
}
The first line of the table, called the table header, declares the data variables. The subsequent lines, called table rows, hold the corresponding values. For each row, the feature method will get executed once; we call this an iteration of the method. If an iteration fails, the remaining iterations will nevertheless be executed. All failures will be reported.
Data tables must have at least two columns. A single-column table can be written as:
where:
a | _
1 | _
7 | _
0 | _
Isolated Execution of Iterations
Iterations are isolated from each other in the same way as separate feature methods. Each iteration gets its own instance
of the specification class, and the setup and cleanup methods will be called before and after each iteration,
respectively.
Sharing of Objects between Iterations
In order to share an object between iterations, it has to be kept in a @Shared or static field.
|
Note
|
Only @Shared and static variables can be accessed from within a where: block.
|
Note that such objects will also be shared with other methods. There is currently no good way to share an object just between iterations of the same method. If you consider this a problem, consider putting each method into a separate spec, all of which can be kept in the same file. This achieves better isolation at the cost of some boilerplate code.
Syntactic Variations
The previous code can be tweaked in a few ways. First, since the where: block already declares all data variables, the
method parameters can be omitted.[1]
Second, inputs and expected outputs can be separated with a double pipe symbol (||) to visually set them apart.
With this, the code becomes:
class MathSpec extends Specification {
  def "maximum of two numbers"() {
    expect:
    Math.max(a, b) == c

    where:
    a | b || c
    1 | 3 || 3
    7 | 4 || 7
    0 | 0 || 0
  }
}
Reporting of Failures
Let’s assume that our implementation of the max method has a flaw, and one of the iterations fails:
maximum of two numbers   FAILED

Condition not satisfied:

Math.max(a, b) == c
    |    |  |  |  |
    |    7  4  |  7
    42         false
The obvious question is: Which iteration failed, and what are its data values? In our example, it isn’t hard to figure
out that it’s the second iteration that failed. At other times this can be more difficult or even impossible.
[2]
In any case, it would be nice if Spock made it loud and clear which iteration failed, rather than just reporting the
failure. This is the purpose of the @Unroll annotation.
Method Unrolling
A method annotated with @Unroll will have its iterations reported independently:
@Unroll
def "maximum of two numbers"() {
...Note that unrolling has no effect on how the method gets executed; it is only an alternation in reporting. Depending on the execution environment, the output will look something like:
maximum of two numbers[0]   PASSED
maximum of two numbers[1]   FAILED

Math.max(a, b) == c
    |    |  |  |  |
    |    7  4  |  7
    42         false

maximum of two numbers[2]   PASSED
This tells us that the second iteration (with index 1) failed. With a bit of effort, we can do even better:
@Unroll
def "maximum of #a and #b is #c"() {
...
This method name uses placeholders, denoted by a leading hash sign (#), to refer to data variables a, b,
and c. In the output, the placeholders will be replaced with concrete values:
maximum of 3 and 5 is 5   PASSED
maximum of 7 and 4 is 7   FAILED

Math.max(a, b) == c
    |    |  |  |  |
    |    7  4  |  7
    42         false

maximum of 0 and 0 is 0   PASSED
Now we can tell at a glance that the max method failed for inputs 7 and 4. See More on Unrolled Method Names
for further details on this topic.
The @Unroll annotation can also be placed on a spec. This has the same effect as placing it on each data-driven
feature method of the spec.
|
Tip
|
You can set the system property spock.assertUnrollExpressions to true,
to let tests fail that have invalid unroll expressions.
This can be used to help catch errors during refactoring.
|
Data Pipes
Data tables aren’t the only way to supply values to data variables. In fact, a data table is just syntactic sugar for one or more data pipes:
...
where:
a << [1, 7, 0]
b << [3, 4, 0]
c << [3, 7, 0]
A data pipe, indicated by the left-shift (<<) operator, connects a data variable to a data provider. The data
provider holds all values for the variable, one per iteration. Any object that Groovy knows how to iterate over can be
used as a data provider. This includes objects of type Collection, String, Iterable, and objects implementing the
Iterable contract. Data providers don’t necessarily have to be the data (as in the case of a Collection);
they can fetch data from external sources like text files, databases and spreadsheets, or generate data randomly.
Data providers are queried for their next value only when needed (before the next iteration).
Multi-Variable Data Pipes
If a data provider returns multiple values per iteration (as an object that Groovy knows how to iterate over), it can be connected to multiple data variables simultaneously. The syntax is somewhat similar to Groovy multi-assignment but uses brackets instead of parentheses on the left-hand side:
@Shared sql = Sql.newInstance("jdbc:h2:mem:", "org.h2.Driver")

def "maximum of two numbers"() {
  expect:
  Math.max(a, b) == c

  where:
  [a, b, c] << sql.rows("select a, b, c from maxdata")
}
Data values that aren’t of interest can be ignored with an underscore (_):
...
where:
[a, b, _, c] << sql.rows("select * from maxdata")
Data Variable Assignment
A data variable can be directly assigned a value:
...
where:
a = 3
b = Math.random() * 100
c = a > b ? a : b
Assignments are re-evaluated for every iteration. As already shown above, the right-hand side of an assignment may refer to other data variables:
...
where:

where:
row << sql.rows("select * from maxdata")
// pick apart columns
a = row.a
b = row.b
c = row.c
Combining Data Tables, Data Pipes, and Variable Assignments
Data tables, data pipes, and variable assignments can be combined as needed:
...
where:
a | _
3 | _
7 | _
0 | _

b << [5, 0, 0]

c = a > b ? a : b
Number of Iterations
The number of iterations depends on how much data is available. Successive executions of the same method can
yield different numbers of iterations. If a data provider runs out of values sooner than its peers, an exception will occur.
Variable assignments don’t affect the number of iterations. A where: block that only contains assignments yields
exactly one iteration.
Closing of Data Providers
After all iterations have completed, the zero-argument close method is called on all data providers that have
such a method.
More on Unrolled Method Names
An unrolled method name is similar to a Groovy GString, except for the following differences:
-
Expressions are denoted with
#instead of$[3], and there is no equivalent for the${…}syntax. -
Expressions only support property access and zero-arg method calls.
Given a class Person with properties name and age, and a data variable person of type Person, the
following are valid method names:
def "#person is #person.age years old"() { // property access
def "#person.name.toUpperCase()"() { // zero-arg method call
Non-string values (like #person above) are converted to Strings according to Groovy semantics.
The following are invalid method names:
def "#person.name.split(' ')[1]" {  // cannot have method arguments
def "#person.age / 2" {  // cannot use operators
If necessary, additional data variables can be introduced to hold more complex expression:
def "#lastName"() { // zero-arg method call
  ...
  where:
  person << [new Person(age: 14, name: 'Phil Cole')]
  lastName = person.name.split(' ')[1]
}
Interaction Based Testing
Interaction-based testing is a design and testing technique that emerged in the Extreme Programming (XP) community in the early 2000’s. Focusing on the behavior of objects rather than their state, it explores how the object(s) under specification interact, by way of method calls, with their collaborators.
For example, suppose we have a Publisher that sends messages to its `Subscriber`s:
class Publisher {
  List<Subscriber> subscribers = []
  int messageCount = 0
  void send(String message){
    subscribers*.receive(message)
    messageCount++
  }
}

interface Subscriber {
  void receive(String message)
}

class PublisherSpec extends Specification {
  Publisher publisher = new Publisher()
}
How are we going to test Publisher? With state-based testing, we can verify that the publisher keeps track of its
subscribers. The more interesting question, though, is whether a message sent by the publisher
is received by the subscribers. To answer this question, we need a special implementation of
Subscriber that listens in on the conversation between the publisher and its subscribers. Such an
implementation is called a mock object.
While we could certainly create a mock implementation of Subscriber by hand, writing and maintaining this code
can get unpleasant as the number of methods and complexity of interactions increases. This is where mocking frameworks
come in: They provide a way to describe the expected interactions between an object under specification and its
collaborators, and can generate mock implementations of collaborators that verify these expectations.
The Java world has no shortage of popular and mature mocking frameworks: JMock, EasyMock, Mockito, to name just a few. Although each of these tools can be used together with Spock, we decided to roll our own mocking framework, tightly integrated with Spock’s specification language. This decision was driven by the desire to leverage all of Groovy’s capabilities to make interaction-based tests easier to write, more readable, and ultimately more fun. We hope that by the end of this chapter, you will agree that we have achieved these goals.
Except where indicated, all features of Spock’s mocking framework work both for testing Java and Groovy code.
Creating Mock Objects
Mock objects are created with the MockingApi.Mock() method.[4]
Let’s create two mock subscribers:
def subscriber = Mock(Subscriber)
def subscriber2 = Mock(Subscriber)
Alternatively, the following Java-like syntax is supported, which may give better IDE support:
Subscriber subscriber = Mock()
Subscriber subscriber2 = Mock()
Here, the mock’s type is inferred from the variable type on the left-hand side of the assignment.
|
Note
|
If the mock’s type is given on the left-hand side of the assignment, it’s permissible (though not required) to omit it on the right-hand side. |
Mock objects literally implement (or, in the case of a class, extend) the type they stand in for. In other
words, in our example subscriber is-a Subscriber. Hence it can be passed to statically typed (Java)
code that expects this type.
Default Behavior of Mock Objects
Initially, mock objects have no behavior. Calling methods on them is allowed but has no effect other than returning
the default value for the method’s return type (false, 0, or null). An exception are the Object.equals,
Object.hashCode, and Object.toString methods, which have the following default behavior: A mock object is only
equal to itself, has a unique hash code, and a string representation that includes the name of the type it represents.
This default behavior is overridable by stubbing the methods, which we will learn about in the Stubbing section.
Injecting Mock Objects into Code Under Specification
After creating the publisher and its subscribers, we need to make the latter known to the former:
class PublisherSpec extends Specification {
  Publisher publisher = new Publisher()
  Subscriber subscriber = Mock()
  Subscriber subscriber2 = Mock()

  def setup() {
    publisher.subscribers << subscriber // << is a Groovy shorthand for List.add()
    publisher.subscribers << subscriber2
  }
We are now ready to describe the expected interactions between the two parties.
Mocking
Mocking is the act of describing (mandatory) interactions between the object under specification and its collaborators. Here is an example:
def "should send messages to all subscribers"() {
  when:
  publisher.send("hello")

  then:
  1 * subscriber.receive("hello")
  1 * subscriber2.receive("hello")
}
Read out aloud: "When the publisher sends a 'hello' message, then both subscribers should receive that message exactly once."
When this feature method gets run, all invocations on mock objects that occur while executing the
when block will be matched against the interactions described in the then: block. If one of the interactions isn’t
satisfied, a (subclass of) InteractionNotSatisfiedError will be thrown. This verification happens automatically
and does not require any additional code.
Interactions
Let’s take a closer look at the then: block. It contains two interactions, each of which has four distinct
parts: a cardinality, a target constraint, a method constraint, and an argument constraint:
1 * subscriber.receive("hello")
|   |          |       |
|   |          |       argument constraint
|   |          method constraint
|   target constraint
cardinality
Cardinality
The cardinality of an interaction describes how often a method call is expected. It can either be a fixed number or a range:
1 * subscriber.receive("hello")      // exactly one call
0 * subscriber.receive("hello")      // zero calls
(1..3) * subscriber.receive("hello") // between one and three calls (inclusive)
(1.._) * subscriber.receive("hello") // at least one call
(_..3) * subscriber.receive("hello") // at most three calls
_ * subscriber.receive("hello")      // any number of calls, including zero
                                     // (rarely needed; see 'Strict Mocking')
Target Constraint
The target constraint of an interaction describes which mock object is expected to receive the method call:
1 * subscriber.receive("hello") // a call to 'subscriber'
1 * _.receive("hello")          // a call to any mock object
Method Constraint
The method constraint of an interaction describes which method is expected to be called:
1 * subscriber.receive("hello") // a method named 'receive'
1 * subscriber./r.*e/("hello")  // a method whose name matches the given regular expression
                                // (here: method name starts with 'r' and ends in 'e')
When expecting a call to a getter method, Groovy property syntax can be used instead of method syntax:
1 * subscriber.status // same as: 1 * subscriber.getStatus()When expecting a call to a setter method, only method syntax can be used:
1 * subscriber.setStatus("ok") // NOT: 1 * subscriber.status = "ok"Argument Constraints
The argument constraints of an interaction describe which method arguments are expected:
1 * subscriber.receive("hello")        // an argument that is equal to the String "hello"
1 * subscriber.receive(!"hello")       // an argument that is unequal to the String "hello"
1 * subscriber.receive()               // the empty argument list (would never match in our example)
1 * subscriber.receive(_)              // any single argument (including null)
1 * subscriber.receive(*_)             // any argument list (including the empty argument list)
1 * subscriber.receive(!null)          // any non-null argument
1 * subscriber.receive(_ as String)    // any non-null argument that is-a String
1 * subscriber.receive(endsWith("lo")) // any non-null argument that is-a String
1 * subscriber.receive({ it.size() > 3 && it.contains('a') })
// an argument that satisfies the given predicate, meaning that
// code argument constraints need to return true of false
// depending on whether they match or not
// (here: message length is greater than 3 and contains the character a)
Argument constraints work as expected for methods with multiple arguments:
1 * process.invoke("ls", "-a", _, !null, { ["abcdefghiklmnopqrstuwx1"].contains(it) })When dealing with vararg methods, vararg syntax can also be used in the corresponding interactions:
interface VarArgSubscriber {
    void receive(String... messages)
}

...

subscriber.receive("hello", "goodbye")Equality Constraint
The equality constraint uses groovy equality to check the argument, i.e, argument == constraint. You can use
-
any literal
1 * check('string')/1 * check(1)/1 * check(null), -
a variable
1 * check(var), -
a list or map literal
1 * check([1])/1 * check([foo: 'bar']), -
an object
1 * check(new Person('sam')), -
or the result of a method call
1 * check(person())
as an equality constraint.
Hamcrest Constraint
A variation of the equality constraint, if the constraint object is a Hamcrest matcher, then it will use that matcher to check the argument.
Wildcard Constraint
The wildcard constraint will match any argument null or otherwise. It is the , i.e. 1 * subscriber.receive().
There is also the spread wildcard constraint *_ which matches any number of arguments 1 * subscriber.receive(*_) including none.
Code Constraint
The code constraint is the most versatile of all. It is a groovy closure that gets the argument as its parameter.
The closure is treated as an condition block, so it behaves like a then block, i.e., every line is treated as an implicit assertion.
It can emulate all but the spread wildcard constraint, however it is suggested to use the simpler constraints where possible.
You can do multiple assertions, call methods for assertions, or use with/verifyAll.
1 * list.add({
  verifyAll(it, Person) {
    firstname == 'William'
    lastname == 'Kirk'
    age == 45
  }
})
Negating Constraint
The negating constraint ! is a compound constraint, i.e. it needs to be combined with another constraint to work.
It inverts the result of the nested constraint, e.g, 1 * subscriber.receive(!null) is the combination of
an equality constraint checking for null and then the negating constraint inverting the result, turning it into not null.
Although it can be combined with any other constraint it does not always make sense, e.g., 1 * subscriber.receive(!_) will match nothing.
Also keep in mind that the diagnostics for a non matching negating constraint will just be that the inner
constraint did match, without any more information.
Type Constraint
The type constraint checks for the type/class of the argument, like the negating constraint it is also a compound constraint.
It usually written as _ as Type, which is a combination of the wildcard constraint and the type constraint.
You can combined it with other constraints as well, 1 * subscriber.receive({ it.contains('foo')} as String) will assert that it is
a String before executing the code constraint to check if it contains foo.
Matching Any Method Call
Sometimes it can be useful to match "anything", in some sense of the word:
1 * subscriber._(*_)     // any method on subscriber, with any argument list
1 * subscriber._         // shortcut for and preferred over the above

1 * _._                  // any method call on any mock object
1 * _ // shortcut for and preferred over the above|
Note
|
Although (..) * .(*_) >> _ is a valid interaction declaration,
it is neither good style nor particularly useful.
|
Strict Mocking
Now, when would matching any method call be useful? A good example is strict mocking, a style of mocking where no interactions other than those explicitly declared are allowed:
when:
publisher.publish("hello")

then:
1 * subscriber.receive("hello") // demand one 'receive' call on 'subscriber'
_ * auditing._                  // allow any interaction with 'auditing'
0 * _                           // don't allow any other interaction
0 * only makes sense as the last interaction of a then: block or method. Note the
use of _ * (any number of calls), which allows any interaction with the auditing component.
|
Note
|
_ * is only meaningful in the context of strict mocking. In particular, it is never necessary
when Stubbing an invocation. For example, _ * auditing.record() >> "ok"
can (and should!) be simplified to auditing.record() >> "ok".
|
Where to Declare Interactions
So far, we declared all our interactions in a then: block. This often results in a spec that reads naturally.
However, it is also permissible to put interactions anywhere before the when: block that is supposed to satisfy
them. In particular, this means that interactions can be declared in a setup method. Interactions can also be
declared in any "helper" instance method of the same specification class.
When an invocation on a mock object occurs, it is matched against interactions in the interactions' declared order.
If an invocation matches multiple interactions, the earliest declared interaction that hasn’t reached its upper
invocation limit will win. There is one exception to this rule: Interactions declared in a then: block are
matched against before any other interactions. This allows to override interactions declared in, say, a setup
method with interactions declared in a then: block.
Declaring Interactions at Mock Creation Time
If a mock has a set of "base" interactions that don’t vary, they can be declared right at mock creation time:
Subscriber subscriber = Mock {
   1 * receive("hello")
   1 * receive("goodbye")
}
This feature is particularly attractive for Stubbing and with dedicated Stubs. Note that the interactions don’t (and cannot [5]) have a target constraint; it’s clear from the context which mock object they belong to.
Interactions can also be declared when initializing an instance field with a mock:
class MySpec extends Specification {
    Subscriber subscriber = Mock {
        1 * receive("hello")
        1 * receive("goodbye")
    }
}
Grouping Interactions with Same Target
Interactions sharing the same target can be grouped in a Specification.with block. Similar to
Declaring Interactions at Mock Creation Time, this makes it unnecessary
to repeat the target constraint:
with(subscriber) {
    1 * receive("hello")
    1 * receive("goodbye")
}
A with block can also be used for grouping conditions with the same target.
Mixing Interactions and Conditions
A then: block may contain both interactions and conditions. Although not strictly required, it is customary
to declare interactions before conditions:
when:
publisher.send("hello")

then:
1 * subscriber.receive("hello")
publisher.messageCount == 1
Read out aloud: "When the publisher sends a 'hello' message, then the subscriber should receive the message exactly once, and the publisher’s message count should be one."
Explicit Interaction Blocks
Internally, Spock must have full information about expected interactions before they take place.
So how is it possible for interactions to be declared in a then: block?
The answer is that under the hood, Spock moves interactions declared in a then: block to immediately
before the preceding when: block. In most cases this works out just fine, but sometimes it can lead to problems:
when:
publisher.send("hello")

then:
def message = "hello"
1 * subscriber.receive(message)
Here we have introduced a variable for the expected argument. (Likewise, we could have introduced a variable
for the cardinality.) However, Spock isn’t smart enough (huh?) to tell that the interaction is intrinsically
linked to the variable declaration. Hence it will just move the interaction, which will cause a
MissingPropertyException at runtime.
One way to solve this problem is to move (at least) the variable declaration to before the when:
block. (Fans of Data Driven Testing might move the variable into a where: block.)
In our example, this would have the added benefit that we could use the same variable for sending the message.
Another solution is to be explicit about the fact that variable declaration and interaction belong together:
when:
publisher.send("hello")

then:
interaction {
  def message = "hello"
  1 * subscriber.receive(message)
}
Since an MockingApi.interaction block is always moved in its entirety, the code now works as intended.
Scope of Interactions
Interactions declared in a then: block are scoped to the preceding when: block:
when:
publisher.send("message1")

then:
1 * subscriber.receive("message1")

when:
publisher.send("message2")

then:
1 * subscriber.receive("message2")
This makes sure that subscriber receives "message1" during execution of the first when: block,
and "message2" during execution of the second when: block.
Interactions declared outside a then: block are active from their declaration until the end of the
containing feature method.
Interactions are always scoped to a particular feature method. Hence they cannot be declared in a static method,
setupSpec method, or cleanupSpec method. Likewise, mock objects should not be stored in static or @Shared
fields.
Verification of Interactions
There are two main ways in which a mock-based test can fail: An interaction can match more invocations than
allowed, or it can match fewer invocations than required. The former case is detected right when the invocation
happens, and causes a TooManyInvocationsError:
Too many invocations for:

2 * subscriber.receive(_) (3 invocations)
To make it easier to diagnose why too many invocations matched, Spock will show all invocations matching the interaction in question:
Matching invocations (ordered by last occurrence):

2 * subscriber.receive("hello")   <-- this triggered the error
1 * subscriber.receive("goodbye")
According to this output, one of the receive("hello") calls triggered the TooManyInvocationsError.
Note that because indistinguishable calls like the two invocations of subscriber.receive("hello") are aggregated
into a single line of output, the first receive("hello") may well have occurred before the receive("goodbye").
The second case (fewer invocations than required) can only be detected once execution of the when block has completed.
(Until then, further invocations may still occur.) It causes a TooFewInvocationsError:
Too few invocations for:

1 * subscriber.receive("hello") (0 invocations)
Note that it doesn’t matter whether the method was not called at all, the same method was called with different arguments,
the same method was called on a different mock object, or a different method was called "instead" of this one;
in either case, a TooFewInvocationsError error will occur.
To make it easier to diagnose what happened "instead" of a missing invocation, Spock will show all invocations that didn’t match any interaction, ordered by their similarity with the interaction in question. In particular, invocations that match everything but the interaction’s arguments will be shown first:
Unmatched invocations (ordered by similarity):

1 * subscriber.receive("goodbye")
1 * subscriber2.receive("hello")
Invocation Order
Often, the exact method invocation order isn’t relevant and may change over time. To avoid over-specification, Spock defaults to allowing any invocation order, provided that the specified interactions are eventually satisfied:
then:
2 * subscriber.receive("hello")
1 * subscriber.receive("goodbye")
Here, any of the invocation sequences "hello" "hello" "goodbye", "hello" "goodbye" "hello", and
"goodbye" "hello" "hello" will satisfy the specified interactions.
In those cases where invocation order matters, you can impose an order by splitting up interactions into
multiple then: blocks:
then:
2 * subscriber.receive("hello")

then:
1 * subscriber.receive("goodbye")
Now Spock will verify that both "hello"'s are received before the "goodbye".
In other words, invocation order is enforced between but not within then: blocks.
|
Note
|
Splitting up a then: block with and: does not impose any ordering, as and:
is only meant for documentation purposes and doesn’t carry any semantics.
|
Mocking Classes
Besides interfaces, Spock also supports mocking of classes. Mocking classes works
just like mocking interfaces; the only additional requirement is to put cglib-nodep-2.2 or higher
and objenesis-1.2 or higher on the class path. If either of these libraries is missing from
the class path, Spock will gently let you know.
|
Note
|
Java 8 is only supported from CGLIB 3.2.0 onwards. |
Stubbing
Stubbing is the act of making collaborators respond to method calls in a certain way. When stubbing a method, you don’t care if and how many times the method is going to be called; you just want it to return some value, or perform some side effect, whenever it gets called.
For the sake of the following examples, let’s modify the Subscriber's receive method
to return a status code that tells if the subscriber was able to process a message:
interface Subscriber {
    String receive(String message)
}
Now, let’s make the receive method return "ok" on every invocation:
subscriber.receive(_) >> "ok"Read out aloud: "Whenever the subscriber receives a message, make it respond with 'ok'."
Compared to a mocked interaction, a stubbed interaction has no cardinality on the left end, but adds a response generator on the right end:
subscriber.receive(_) >> "ok"
|          |       |     |
|          |       |     response generator
|          |       argument constraint
|          method constraint
target constraint
A stubbed interaction can be declared in the usual places: either inside a then: block, or anywhere before a
when: block. (See Where to Declare Interactions for the details.) If a mock object is only used for stubbing,
it’s common to declare interactions at mock creation time or in a
given: block.
Returning Fixed Values
We have already seen the use of the right-shift (>>) operator to return a fixed value:
subscriber.receive(_) >> "ok"To return different values for different invocations, use multiple interactions:
subscriber.receive("message1") >> "ok"
subscriber.receive("message2") >> "fail"
This will return "ok" whenever "message1" is received, and "fail" whenever
"message2" is received. There is no limit as to which values can be returned, provided they are
compatible with the method’s declared return type.
Returning Sequences of Values
To return different values on successive invocations, use the triple-right-shift (>>>) operator:
subscriber.receive(_) >>> ["ok", "error", "error", "ok"]This will return "ok" for the first invocation, "error" for the second and third invocation,
and "ok" for all remaining invocations. The right-hand side must be a value that Groovy knows how to iterate over;
in this example, we’ve used a plain list.
Computing Return Values
To compute a return value based on the method’s argument, use the the right-shift (>>) operator together with a closure.
If the closure declares a single untyped parameter, it gets passed the method’s argument list:
subscriber.receive(_) >> { args -> args[0].size() > 3 ? "ok" : "fail" }Here "ok" gets returned if the message is more than three characters long, and "fail" otherwise.
In most cases it would be more convenient to have direct access to the method’s arguments. If the closure declares more than one parameter or a single typed parameter, method arguments will be mapped one-by-one to closure parameters:[6]
subscriber.receive(_) >> { String message -> message.size() > 3 ? "ok" : "fail" }This response generator behaves the same as the previous one, but is arguably more readable.
If you find yourself in need of more information about a method invocation than its arguments, have a look at
org.spockframework.mock.IMockInvocation. All methods declared in this interface are available inside the closure,
without a need to prefix them. (In Groovy terminology, the closure delegates to an instance of IMockInvocation.)
Performing Side Effects
Sometimes you may want to do more than just computing a return value. A typical example is throwing an exception. Again, closures come to the rescue:
subscriber.receive(_) >> { throw new InternalError("ouch") }Of course, the closure can contain more code, for example a println statement. It
will get executed every time an incoming invocation matches the interaction.
Chaining Method Responses
Method responses can be chained:
subscriber.receive(_) >>> ["ok", "fail", "ok"] >> { throw new InternalError() } >> "ok"This will return "ok", "fail", "ok" for the first three invocations, throw InternalError
for the fourth invocations, and return ok for any further invocation.
Combining Mocking and Stubbing
Mocking and stubbing go hand-in-hand:
1 * subscriber.receive("message1") >> "ok"
1 * subscriber.receive("message2") >> "fail"
When mocking and stubbing the same method call, they have to happen in the same interaction. In particular, the following Mockito-style splitting of stubbing and mocking into two separate statements will not work:
given:
subscriber.receive("message1") >> "ok"

when:
publisher.send("message1")

then:
1 * subscriber.receive("message1")
As explained in Where to Declare Interactions, the receive call will first get matched against
the interaction in the then: block. Since that interaction doesn’t specify a response, the default
value for the method’s return type (null in this case) will be returned. (This is just another
facet of Spock’s lenient approach to mocking.). Hence, the interaction in the given: block will never
get a chance to match.
|
Note
|
Mocking and stubbing of the same method call has to happen in the same interaction. |
Other Kinds of Mock Objects
So far, we have created mock objects with the MockingApi.Mock method. Aside from
this method, the MockingApi class provides a couple of other factory methods for creating
more specialized kinds of mock objects.
Stubs
A stub is created with the MockingApi.Stub factory method:
Subscriber subscriber = Stub()Whereas a mock can be used both for stubbing and mocking, a stub can only be used for stubbing. Limiting a collaborator to a stub communicates its role to the readers of the specification.
|
Note
|
If a stub invocation matches a mandatory interaction (like 1 * foo.bar()), an InvalidSpecException is thrown.
|
Like a mock, a stub allows unexpected invocations. However, the values returned by a stub in such cases are more ambitious:
-
For primitive types, the primitive type’s default value is returned.
-
For non-primitive numerical values (such as
BigDecimal), zero is returned. -
For non-numerical values, an "empty" or "dummy" object is returned. This could mean an empty String, an empty collection, an object constructed from its default constructor, or another stub returning default values. See class
org.spockframework.mock.EmptyOrDummyResponsefor the details.
|
Note
|
If the response type of the method is a final class or if it requires a class-mocking library and cglib or ByteBuddy
are not available, then the "dummy" object creation will fail with a CannotCreateMockException.
|
A stub often has a fixed set of interactions, which makes declaring interactions at mock creation time particularly attractive:
Subscriber subscriber = Stub {
    receive("message1") >> "ok"
    receive("message2") >> "fail"
}
Spies
(Think twice before using this feature. It might be better to change the design of the code under specification.)
A spy is created with the MockingApi.Spy factory method:
SubscriberImpl subscriber = Spy(constructorArgs: ["Fred"])A spy is always based on a real object. Hence you must provide a class type rather than an interface type, along with any constructor arguments for the type. If no constructor arguments are provided, the type’s default constructor will be used.
You may also create a spy from an instantiated object. This may be useful in cases where you do not have full control over the instatiation of types you are interested in spying. (For example when testing within a Dependency Injection framework such as Spring or Guice.)
Method calls on a spy are automatically delegated to the real object. Likewise, values returned from the real object’s methods are passed back to the caller via the spy.
After creating a spy, you can listen in on the conversation between the caller and the real object underlying the spy:
1 * subscriber.receive(_)Apart from making sure that receive gets called exactly once,
the conversation between the publisher and the SubscriberImpl instance underlying the spy remains unaltered.
When stubbing a method on a spy, the real method no longer gets called:
subscriber.receive(_) >> "ok"Instead of calling SubscriberImpl.receive, the receive method will now simply return "ok".
Sometimes, it is desirable to both execute some code and delegate to the real method:
subscriber.receive(_) >> { String message -> callRealMethod(); message.size() > 3 ? "ok" : "fail" }Here we use callRealMethod() to delegate the method invocation to the real object.
Note that we don’t have to pass the message argument along; this is taken care of automatically. callRealMethod()
returns the real invocation’s result, but in this example we opted to return our own result instead.
If we had wanted to pass a different message to the real method, we could have used callRealMethodWithArgs("changed message").
Partial Mocks
(Think twice before using this feature. It might be better to change the design of the code under specification.)
Spies can also be used as partial mocks:
// this is now the object under specification, not a collaborator
MessagePersister persister = Spy {
  // stub a call on the same object
  isPersistable(_) >> true
}

when:
persister.receive("msg")

then:
// demand a call on the same object
1 * persister.persist("msg")
Groovy Mocks
So far, all the mocking features we have seen work the same no matter if the calling code is written in Java or Groovy.
By leveraging Groovy’s dynamic capabilities, Groovy mocks offer some additional features specifically for testing Groovy code.
They are created with the MockingApi.GroovyMock(), MockingApi.GroovyStub(), and MockingApi.GroovySpy() factory methods.
|
Tip
|
When Should Groovy Mocks be Favored over Regular Mocks? Groovy mocks should be used when the code under specification is written in Groovy and some of the unique Groovy mock features are needed. When called from Java code, Groovy mocks will behave like regular mocks. Note that it isn’t necessary to use a Groovy mock merely because the code under specification and/or mocked type is written in Groovy. Unless you have a concrete reason to use a Groovy mock, prefer a regular mock. |
Mocking Dynamic Methods
All Groovy mocks implement the GroovyObject interface. They support the mocking and stubbing of
dynamic methods as if they were physically declared methods:
Subscriber subscriber = GroovyMock()

1 * subscriber.someDynamicMethod("hello")
Mocking All Instances of a Type
(Think twice before using this feature. It might be better to change the design of the code under specification.)
Usually, Groovy mocks need to be injected into the code under specification just like regular mocks. However, when a Groovy mock is created as global, it automagically replaces all real instances of the mocked type for the duration of the feature method:[7]
def publisher = new Publisher()
publisher << new RealSubscriber() << new RealSubscriber()

RealSubscriber anySubscriber = GroovyMock(global: true)

when:
publisher.publish("message")

then:
2 * anySubscriber.receive("message")
Here, we set up the publisher with two instances of a real subscriber implementation. Then we create a global mock of the same type. This reroutes all method calls on the real subscribers to the mock object. The mock object’s instance isn’t ever passed to the publisher; it is only used to describe the interaction.
|
Note
|
A global mock can only be created for a class type. It effectively replaces all instances of that type for the duration of the feature method. |
Since global mocks have a somewhat, well, global effect, it’s often convenient
to use them together with GroovySpy. This leads to the real code getting
executed unless an interaction matches, allowing you to selectively listen
in on objects and change their behavior just where needed.
Mocking Constructors
(Think twice before using this feature. It might be better to change the design of the code under specification.)
Global mocks support mocking of constructors:
RealSubscriber anySubscriber = GroovySpy(global: true)

1 * new RealSubscriber("Fred")
Since we are using a spy, the object returned from the constructor call remains unchanged. To change which object gets constructed, we can stub the constructor:
new RealSubscriber("Fred") >> new RealSubscriber("Barney")Now, whenever some code tries to construct a subscriber named Fred, we’ll construct a subscriber named Barney instead.
Mocking Static Methods
(Think twice before using this feature. It might be better to change the design of the code under specification.)
Global mocks support mocking and stubbing of static methods:
RealSubscriber anySubscriber = GroovySpy(global: true)

1 * RealSubscriber.someStaticMethod("hello") >> 42
The same works for dynamic static methods.
When a global mock is used solely for mocking constructors and static methods, the mock’s instance isn’t really needed. In such a case one can just write:
GroovySpy(RealSubscriber, global: true)Advanced Features
Most of the time you shouldn’t need these features. But if you do, you’ll be glad to have them.
A la Carte Mocks
At the end of the day, the Mock(), Stub(), and Spy() factory methods are just canned ways to
create mock objects with a certain configuration. If you want more fine-grained control over a mock’s configuration,
have a look at the org.spockframework.mock.IMockConfiguration interface. All properties of this interface
[8]
can be passed as named arguments to the Mock() method. For example:
def person = Mock(name: "Fred", type: Person, defaultResponse: ZeroOrNullResponse, verified: false)Here, we create a mock whose default return values match those of a Mock(), but whose invocations aren’t
verified (as for a Stub()). Instead of passing ZeroOrNullResponse, we could have supplied our own custom
org.spockframework.mock.IDefaultResponse for responding to unexpected method invocations.
Detecting Mock Objects
To find out whether a particular object is a Spock mock object, use a org.spockframework.mock.MockUtil:
MockUtil mockUtil = new MockUtil()
List list1 = []
List list2 = Mock()

expect:
!mockUtil.isMock(list1)
mockUtil.isMock(list2)
An util can also be used to get more information about a mock object:
IMockObject mock = mockUtil.asMock(list2)

expect:
mock.name == "list2"
mock.type == List
mock.nature == MockNature.MOCK
Further Reading
If you would like to dive deeper into interaction-based testing, we recommend the following resources:
- Endo-Testing: Unit Testing with Mock Objects
-
Paper from the XP2000 conference that introduces the concept of mock objects.
- Mock Roles, not Objects
-
Paper from the OOPSLA2004 conference that explains how to do mocking right.
- Mocks Aren’t Stubs
-
Martin Fowler’s take on mocking.
- Growing Object-Oriented Software Guided by Tests
-
TDD pioneers Steve Freeman and Nat Pryce explain in detail how test-driven development and mocking work in the real world.
Extensions
Spock comes with a powerful extension mechanism, which allows to hook into a spec’s lifecycle to enrich or alter its behavior. In this chapter, we will first learn about Spock’s built-in extensions, and then dive into writing custom extensions.
Spock Configuration File
Some extensions can be configured with options in a Spock configuration file. The description for each extension will
mention how it can be configured. All those configurations are in a Groovy file that usually is called
SpockConfig.groovy. Spock first searches for a custom location given in a system property called spock.configuration
which is then used either as classpath location or if not found as file system location if it can be found there,
otherwise the default locations are investigated for a configuration file. Next it searches for the SpockConfig.groovy
in the root of the test execution classpath. If there is also no such file, you can at last have a SpockConfig.groovy
in your Spock user home. This by default is the directory .spock within your home directory, but can be changed using
the system property spock.user.home or if not set the environment property SPOCK_USER_HOME.
Stack Trace Filtering
You can configure Spock whether it should filter stack traces or not by using the configuration file. The default value
is true.
runner {
  filterStackTrace false
}
Built-In Extensions
Most of Spock’s built-in extensions are annotation-driven. In other words, they are triggered by annotating a
spec class or method with a certain annotation. You can tell such an annotation by its @ExtensionAnnotation
meta-annotation.
Ignore
To temporarily prevent a feature method from getting executed, annotate it with spock.lang.Ignore:
@Ignore
def "my feature"() { ... }
For documentation purposes, a reason can be provided:
@Ignore("TODO")
def "my feature"() { ... }
To ignore a whole specification, annotate its class:
@Ignore
class MySpec extends Specification { ... }
In most execution environments, ignored feature methods and specs will be reported as "skipped".
Care should be taken when ignoring feature methods in a spec class annotated with spock.lang.Stepwise since
later feature methods may depend on earlier feature methods having executed.
IgnoreRest
To ignore all but a (typically) small subset of methods, annotate the latter with spock.lang.IgnoreRest:
def "I'll be ignored"() { ... }

@IgnoreRest
def "I'll run"() { ... }

def "I'll also be ignored"() { ... }
@IgnoreRest is especially handy in execution environments that don’t provide an (easy) way to run a subset of methods.
Care should be taken when ignoring feature methods in a spec class annotated with spock.lang.Stepwise since
later feature methods may depend on earlier feature methods having executed.
IgnoreIf
To ignore a feature method under certain conditions, annotate it with spock.lang.IgnoreIf,
followed by a predicate:
@IgnoreIf({ System.getProperty("os.name").contains("windows") })
def "I'll run everywhere but on Windows"() { ... }
To make predicates easier to read and write, the following properties are available inside the closure:
-
sysA map of all system properties -
envA map of all environment variables -
osInformation about the operating system (seespock.util.environment.OperatingSystem) -
jvmInformation about the JVM (seespock.util.environment.Jvm)
Using the os property, the previous example can be rewritten as:
@IgnoreIf({ os.windows })
def "I'll run everywhere but on Windows"() { ... }
Care should be taken when ignoring feature methods in a spec class annotated with spock.lang.Stepwise since
later feature methods may depend on earlier feature methods having executed.
Requires
To execute a feature method under certain conditions, annotate it with spock.lang.Requires,
followed by a predicate:
@Requires({ os.windows })
def "I'll only run on Windows"() { ... }
Requires works exactly like IgnoreIf, except that the predicate is inverted. In general, it is preferable
to state the conditions under which a method gets executed, rather than the conditions under which it gets ignored.
PendingFeature
To indicate that the feature is not fully implemented yet and should not be reported as error, annotate it with spock.lang.PendingFeature.
The use case is to annotate tests that can not yet run but should already be committed.
The main difference to Ignore is that the test are executed, but test failures are ignored.
If the test passes without an error, then it will be reported as failure since the PendingFeature annotation should be removed.
This way the tests will become part of the normal tests instead of being ignored forever.
Groovy has the groovy.transform.NotYetImplemented annotation which is similar but behaves a differently.
-
it will mark failing tests as passed
-
if at least one iteration of a data-driven test passes it will be reported as error
PendingFeature:
-
it will mark failing tests as skipped
-
if at least one iteration of a data-driven test fails it will be reported as skipped
-
if every iteration of a data-driven test passes it will be reported as error
@PendingFeature
def "not implemented yet"() { ... }
Stepwise
To execute features in the order that they are declared, annotate a spec class with spock.lang.Stepwise:
@Stepwise
class RunInOrderSpec extends Specification {
  def "I run first"()  { ... }
  def "I run second"() { ... }
}
Stepwise only affects the class carrying the annotation; not sub or super classes. Features after the first
failure are skipped.
Stepwise does not override the behaviour of annotations such as Ignore, IgnoreRest, and IgnoreIf, so care
should be taken when ignoring feature methods in spec classes annotated with Stepwise.
Timeout
To fail a feature method, fixture, or class that exceeds a given execution duration, use spock.lang.Timeout,
followed by a duration, and optionally a time unit. The default time unit is seconds.
When applied to a feature method, the timeout is per execution of one iteration, excluding time spent in fixture methods:
@Timeout(5)
def "I fail if I run for more than five seconds"() { ... }

@Timeout(value = 100, unit = TimeUnit.MILLISECONDS)
def "I better be quick" { ... }
Applying Timeout to a spec class has the same effect as applying it to each feature that is not already annotated
with Timeout, excluding time spent in fixtures:
@Timeout(10)
class TimedSpec extends Specification {
  def "I fail after ten seconds"() { ... }
  def "Me too"() { ... }

  @Timeout(value = 250, unit = MILLISECONDS)
  def "I fail much faster"() { ... }
}
When applied to a fixture method, the timeout is per execution of the fixture method.
When a timeout is reported to the user, the stack trace shown reflects the execution stack of the test framework when the timeout was exceeded.
Retry
The @Retry extensions can be used for flaky integration tests, where remote systems can fail sometimes.
By default it retries an iteration 3 times with 0 delay if either an Exception or AssertionError has been thrown, all this is configurable.
In addition, an optional condition closure can be used to determine if a feature should be retried.
It also provides special support for data driven features, offering to either retry all iterations or just the failing ones.
class FlakyIntegrationSpec extends Specification {
  @Retry
  def retry3Times() { ... }

  @Retry(count = 5)
  def retry5Times() { ... }

  @Retry(exceptions=[IOException])
  def onlyRetryIOException() { ... }

  @Retry(condition = { failure.message.contains('foo') })
  def onlyRetryIfConditionOnFailureHolds() { ... }

  @Retry(condition = { instance.field != null })
  def onlyRetryIfConditionOnInstanceHolds() { ... }

  @Retry
  def retryFailingIterations() {
    ...
    where:
    data << sql.select()
  }

  @Retry(mode = Retry.Mode.FEATURE)
  def retryWholeFeature() {
    ...
    where:
    data << sql.select()
  }

  @Retry(delay = 1000)
  def retryAfter1000MsDelay() { ... }
}
Retries can also be applied to spec classes which has the same effect as applying it to each feature method that isn’t already annotated with {@code Retry}.
@Retry
class FlakyIntegrationSpec extends Specification {
  def "will be retried with config from class"() {
    ...
  }
  @Retry(count = 5)
  def "will be retried using its own config"() {
    ...
  }
}
A {@code @Retry} annotation that is declared on a spec class is applied to all features in all subclasses as well, unless a subclass declares its own annotation. If so, the retries defined in the subclass are applied to all feature methods declared in the subclass as well as inherited ones.
Given the following example, running FooIntegrationSpec will execute both inherited and foo with one retry.
Running BarIntegrationSpec will execute inherited and bar with two retries.
@Retry(count = 1)
abstract class AbstractIntegrationSpec extends Specification {
  def inherited() {
    ...
  }
}

class FooIntegrationSpec extends AbstractIntegrationSpec {
  def foo() {
    ...
  }
}

@Retry(count = 2)
class BarIntegrationSpec extends AbstractIntegrationSpec {
  def bar() {
    ...
  }
}
Check RetryFeatureExtensionSpec for more examples.
Use
To activate one or more Groovy categories within the scope of a feature method or spec, use spock.util.mop.Use:
class ListExtensions {
  static avg(List list) { list.sum() / list.size() }
}

class MySpec extends Specification {
  @Use(listExtensions)
  def "can use avg() method"() {
    expect:
    [1, 2, 3].avg() == 2
  }
}
This can be useful for stubbing of dynamic methods, which are usually provided by the runtime environment (e.g. Grails). It has no effect when applied to a helper method. However, when applied to a spec class, it will also affect its helper methods.
ConfineMetaClassChanges
To confine meta class changes to the scope of a feature method or spec class, use spock.util.mop.ConfineMetaClassChanges:
@Stepwise
class FooSpec extends Specification {
  @ConfineMetaClassChanges([String])
  def "I run first"() {
    when:
    String.metaClass.someMethod = { delegate }

    then:
    String.metaClass.hasMetaMethod('someMethod')
  }

  def "I run second"() {
    when:
    "Foo".someMethod()

    then:
    thrown(MissingMethodException)
  }
}
When applied to a spec class, the meta classes are restored to the state that they were in before setupSpec was executed,
after cleanupSpec is executed.
When applied to a feature method, the meta classes are restored to as they were after setup was executed,
before cleanup is executed.
|
Caution
|
Temporarily changing the meta classes is only safe when specs are run in a single thread per JVM. Even though many execution environments do limit themselves to one thread per JVM, keep in mind that Spock cannot enforce this. |
RestoreSystemProperties
Saves system properties before the annotated feature method (including any setup and cleanup methods) gets run, and restores them afterwards.
Applying this annotation to a spec class has the same effect as applying it to all its feature methods.
@RestoreSystemProperties
def "determines family based on os.name system property"() {
  given:
  System.setProperty('os.name', 'Windows 7')

  expect:
  OperatingSystem.current.family == OperatingSystem.Family.WINDOWS
}|
Caution
|
Temporarily changing the values of system properties is only safe when specs are run in a single thread per JVM. Even though many execution environments do limit themselves to one thread per JVM, keep in mind that Spock cannot enforce this. |
AutoAttach
Automatically attaches a detached mock to the current Specification. Use this if there is no direct framework
support available. Spring and Guice dependency injection is automatically handled by the
Spring Module and Guice Module respectively.
AutoCleanup
Automatically clean up a field or property at the end of its lifetime by using spock.lang.AutoCleanup.
By default, an object is cleaned up by invoking its parameterless close() method. If some other
method should be called instead, override the annotation’s value attribute:
// invoke foo.dispose()
@AutoCleanup("dispose")
def foo
If multiple fields or properties are annotated with AutoCleanup, their objects are cleaned up sequentially, in reverse
field/property declaration order, starting from the most derived class class and walking up the inheritance chain.
If a cleanup operation fails with an exception, the exception is reported by default, and cleanup proceeds with the next
annotated object. To prevent cleanup exceptions from being reported, override the annotation’s quiet attribute:
@AutoCleanup(quiet = true)
def ignoreMyExceptions
Title and Narrative
To attach a natural-language name to a spec, use spock.lang.Title:
@Title("This is easy to read")
class ThisIsHarderToReadSpec extends Specification {
  ...
}
Similarly, to attach a natural-language description to a spec, use spock.lang.Narrative:
@Narrative("""
As a user
I want foo
So that bar
""")
class GiveTheUserFooSpec() { ... }
See
To link to one or more references to external information related to a specification or feature, use spock.lang.See:
@See("http://spockframework.org/spec")
class MoreInformationAvailableSpec extends Specification {
  @See(["http://en.wikipedia.org/wiki/Levenshtein_distance", "http://www.levenshtein.net/"])
  def "Even more information is available on the feature"() { ... }
}
Issue
To indicate that a feature or spec relates to one or more issues in an external tracking system, use spock.lang.Issue:
@Issue("http://my.issues.org/FOO-1")
class MySpec {
  @Issue("http://my.issues.org/FOO-2")
  def "Foo should do bar"() { ... }

  @Issue(["http://my.issues.org/FOO-3", "http://my.issues.org/FOO-4"])
  def "I have two related issues"() { ... }
}
If you have a common prefix URL for all issues in a project, you can use the Spock Configuration File to set it up
for all at once. If it is set, it is prepended to the value of the @Issue annotation when building the URL.
If the issueNamePrefix is set, it is prepended to the value of the @Issue annotation when building the name for the
issue.
report {
    issueNamePrefix 'Bug '
    issueUrlPrefix 'http://my.issues.org/'
}
Subject
To indicate one or more subjects of a spec, use spock.lang.Subject:
@Subject([Foo, Bar]) { ... }Additionally, Subject can be applied to fields and local variables:
@Subject
Foo myFoo
Subject currently has only informational purposes.
Rule
Spock understands @org.junit.Rule annotations on non-@Shared instance fields. The according rules are run at the
iteration interception point in the Spock lifecycle. This means that the rules before-actions are done before the
execution of setup methods and the after-actions are done after the execution of cleanup methods.
ClassRule
Spock understands @org.junit.ClassRule annotations on @Shared fields. The according rules are run at the
specification interception point in the Spock lifecycle. This means that the rules before-actions are done before the
execution of setupSpec methods and the after-actions are done after the execution of cleanupSpec methods.
Include and Exclude
Spock is capable of including and excluding specifications according to their classes, super-classes and interfaces and according to annotations that are applied to the specification. Spock is also capable of including and excluding individual features according to annotations that are applied to the feature method. The configuration for what to include or exclude is done according to the Spock Configuration File section.
import some.pkg.Fast
import some.pkg.IntegrationSpec

runner {
  include Fast // could be either an annotation or a (base) class
  exclude {
    annotation some.pkg.Slow
    baseClass IntegrationSpec
  }
}
Optimize Run Order
Spock can remember which features last failed and how often successively and also how long a feature needed to be
tested. For successive runs Spock will then first run features that failed at last run and first features that failed
more often successively. Within the previously failed or non-failed features Spock will run the fastest tests first.
This behaviour can be enabled according to the Spock Configuration File section. The default value is false.
runner {
  optimizeRunOrder true
}
Report Log
Spock can create a report log of the executed tests in JSON format. This report contains also things like
@Title, @Narrative, @See and @Issue values or
block descriptors.
This report can be enabled according to the Spock Configuration File section. The default is to not generate this
report.
For the report to be generated, you have to enable it and set at least the logFileDir and logFileName. enabled can
also be set via the system property spock.logEnabled, logFileDir can also be set via the system property
spock.logFileDir and logFileName can also be set via the system property spock.logFileName.
If a logFileSuffix is set (or the system property spock.logFileSuffix), it is appended to the base filename,
separated by a dash. If the suffix contains the string #timestamp, this is replaced by the current date and time in
UTC automatically. If you instead want to have your local date and time, you can use the setting from the example
below.
report {
    enabled true
    logFileDir '.'
    logFileName 'spock-report.json'
    logFileSuffix new Date().format('yyyy-MM-dd_HH_mm_ss')
}
Third-Party Extensions
You can find a list of third-party extensions in the Spock Wiki.
Writing Custom Extensions
There are two types of extensions that can be created for usage with Spock. These are global extensions and annotation driven local extensions. For both extension types you implement a specific interface which defines some callback methods. In your implementation of those methods you can set up the magic of your extension, for example by adding interceptors to various interception points that are described below.
Which type of annotation you create depends on your use case. If you want to do something once during the Spock run - at the start or end - or want to apply something to all executed specifications without the user of the extension having to do anything besides including your extension in the classpath, then you should opt for a global extension. If you instead want to apply your magic only by choice of the user, then you should implement an annotation driven local extension.
Global Extensions
To create a global extension you need to create a class that implements the interface IGlobalExtension and put its
fully-qualified class name in a file META-INF/services/org.spockframework.runtime.extension.IGlobalExtension in the
class path. As soon as these two conditions are satisfied, the extension is automatically loaded and used when Spock is
running. For convenience there is also the class AbstractGlobalExtension, which provides empty implementations for all
methods in the interface, so that only the needed ones need to be overridden.
IGlobalExtension has the following three methods:
start()-
This is called once at the very start of the Spock execution.
visitSpec(SpecInfo spec)-
This is called once for each specification. In this method you can prepare a specification with your extension magic, like attaching interceptors to various interception points as described in the chapter Interceptors.
stop()-
This is called once at the very end of the Spock execution.
Annotation Driven Local Extensions
To create an annotation driven local extension you need to create a class that implements the interface
IAnnotationDrivenExtension. As type argument to the interface you need to supply an annotation class that has
@Retention set to RUNTIME, @Target set to one or more of FIELD, METHOD and TYPE - depending on where you
want your annotation to be applicable - and @ExtensionAnnotation applied, with the IAnnotationDrivenExtension class
as argument. Of course the annotation class can have some attributes with which the user can further configure the
behaviour of the extension for each annotation application. For convenience there is also the class
AbstractAnnotationDrivenExtension, which provides empty implementations for all methods in the interface, so that only
the needed ones need to be overridden.
Your annotation can be applied to a specification, a feature method, a fixture method or a field. On all other places
like helper methods or other places if the @Target is set accordingly, the annotation will be ignored and has no
effect other than being visible in the source code.
IAnnotationDrivenExtension has the following five methods, where in each you can prepare a specification with your
extension magic, like attaching interceptors to various interception points as described in the chapter
Interceptors:
visitSpecAnnotation(T annotation, SpecInfo spec)-
This is called once for each specification where the annotation is applied with the annotation instance as first parameter and the specification info object as second parameter.
visitFeatureAnnotation(T annotation, FeatureInfo feature)-
This is called once for each feature method where the annotation is applied with the annotation instance as first parameter and the feature info object as second parameter.
visitFixtureAnnotation(T annotation, MethodInfo fixtureMethod)-
This is called once for each fixture method where the annotation is applied with the annotation instance as first parameter and the fixture method info object as second parameter.
visitFieldAnnotation(T annotation, FieldInfo field)-
This is called once for each field where the annotation is applied with the annotation instance as first parameter and the field info object as second parameter.
visitSpec(SpecInfo spec)-
This is called once for each specification within which the annotation is applied to at least one of the supported places like defined above. It gets the specification info object as sole parameter. This method is called after all other methods of this interface for each applied annotation are processed.
Configuration Objects
You can add own sections in the Spock Configuration File for your extension by creating POJOs or POGOs that are
annotated with @ConfigurationObject and have a default constructor (either implicitly or explicitly). The argument to
the annotation is the name of the top-level section that is added to the Spock configuration file syntax. The default
values for the configuration options are defined in the class by initializing the fields at declaration time or in the
constructor. In the Spock configuration file those values can then be edited by the user of your extension.
|
Note
|
It is an error to have multiple configuration objects with the same name, so choose wisely if you pick one and probably prefix it with some package-like name to minimize the risk for name clashes with other extensions or the core Spock code. |
To use the values of the configuration object in your extension, just define an uninitialized instance field of that
type. Spock will then automatically create exactly one instance of the configuration object per Spock run, apply the
settings from the configuration file to it (before the start() methods of global extensions are called) and inject
that instance into the extension class instances.
A configuration object cannot be used exclusively in an annotation driven local extension, but it has to be used in at least one global extension to properly get initialized and populated with the settings from the configuration file. But if the configuration object is used in a global extension, you can also use it just fine in an annotation driven local extension. If the configuration object is only used in an annotation driven local extension, you will get an exception when then configuration object is to be injected into the extension and you will also get an error when the configuration file is evaluated and it contains the section, as the configuration object is not properly registered yet.
Interceptors
For applying the magic of your extension, there are various interception points, where you can attach interceptors from the extension methods described above to hook into the Spock lifecycle. For each interception point there can of course be multiple interceptors added by arbitrary Spock extensions (shipped or 3rd party). Their order is currently depending on the order they are added, but there should not be made any order assumptions within one interception point.
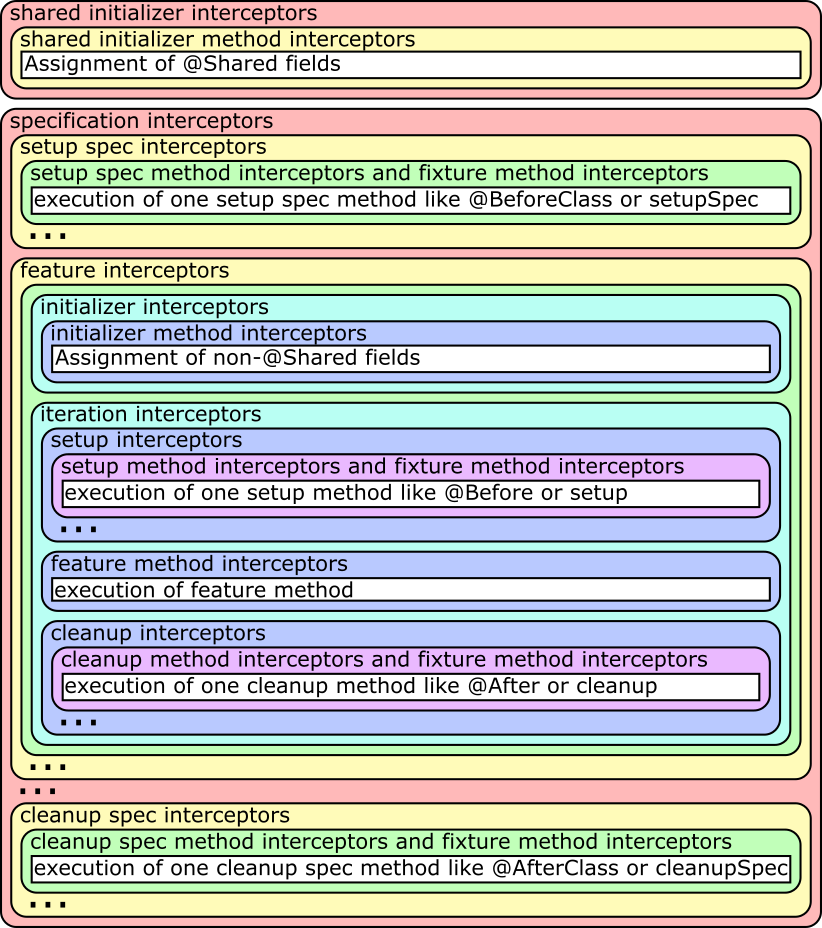
An ellipsis in the figure means that the block before it can be repeated an arbitrary amount of times.
The … method interceptors are of course only run if there are actual methods of this type to be executed (the white
boxes) and those can inject parameters to be given to the method that will be run.
The difference between shared initializer interceptor and shared initializer method interceptor and between initializer
interceptor and initializer method interceptor - as there can be at most one of those methods each - is, that there are
only the two methods if there are @Shared, respectively non-@Shared, fields that get values assigned at declaration
time. The compiler will put those initializations in a generated method and call it at the proper place in the
lifecycle. So if there are no such initializations, no method is generated and thus the method interceptor is never
called. The non-method interceptors are always called at the proper place in the lifecycle to do work that has to be
done at that time.
To create an interceptor to be attached to an interception point, you need to create a class that implements the
interface IMethodInterceptor. This interface has the sole method intercept(IMethodInvocation invocation). The
invocation parameter can be used to get and modify the current state of execution. Each interceptor must call the
method invocation.proceed(), which will go on in the lifecycle, except you really want to prevent further execution of
the nested elements like shown in the figure above. But this should be a very rare use case.
If you write an interceptor that can be used at different interception points and should do different work at different
interception points, there is also the convenience class AbstractMethodInterceptor, which you can extend and which
provides various methods for overriding that are called for the various interception points. Most of these methods have
a double meaning, like interceptSetupMethod which is called for the setup interceptor and the setup method
interceptor. If you attach your interceptor to both of them and need a differentiation, you can check for
invocation.method.reflection, which will be set in the method interceptor case and null otherwise. Alternatively you
can of course build two different interceptors or add a parameter to your interceptor and create two instances, telling
each at addition time whether it is attached to the method interceptor or the other one.
class I extends AbstractMethodInterceptor { I(def s) {} }

specInfo.addSharedInitializerInterceptor new I('shared initializer')
specInfo.sharedInitializerMethod?.addInterceptor new I('shared initializer method')
specInfo.addInterceptor new I('specification')
specInfo.addSetupSpecInterceptor new I('setup spec')
specInfo.setupSpecMethods*.addInterceptor new I('setup spec method')
specInfo.allFeatures*.addInterceptor new I('feature')
specInfo.addInitializerInterceptor new I('initializer')
specInfo.initializerMethod?.addInterceptor new I('initializer method')
specInfo.allFeatures*.addIterationInterceptor new I('iteration')
specInfo.addSetupInterceptor new I('setup')
specInfo.setupMethods*.addInterceptor new I('setup method')
specInfo.allFeatures*.featureMethod*.addInterceptor new I('feature method')
specInfo.addCleanupInterceptor new I('cleanup')
specInfo.cleanupMethods*.addInterceptor new I('cleanup method')
specInfo.addCleanupSpecInterceptor new I('cleanup spec')
specInfo.cleanupSpecMethods*.addInterceptor new I('cleanup spec method')
specInfo.allFixtureMethods*.addInterceptor new I('fixture method')
Injecting Method Parameters
If your interceptor should support custom method parameters for wrapped methods, this can be done by modifying
invocation.arguments. Two use cases for this would be a mocking framework that can inject method parameters that are
annotated with a special annotation or some test helper that injects objects of a specific type that are created and
prepared for usage automatically.
invocation.arguments may be an empty array or an array of arbitrary length, depending on what interceptors were run
before that maybe also have manipulated this array for parameter injection. So if you for example investigated the
method parameters with invocation.method.reflection.parameters and found that you want to inject the fifth parameter,
you should first check whether the arguments array is at least five elements long. If not, you should assign it a new
array that is at least five elements long and copy the contents of the old array into the new one. Then you can assign
your objects to be injected.
// create a map of all MyInjectable parameters with their parameter index
Map<Parameter, Integer> parameters = [:]
invocation.method.reflection.parameters.eachWithIndex { parameter, i ->
  parameters << [(parameter): i]
}
parameters = parameters.findAll { MyInjectable.equals it.key.type }

// enlarge arguments array if necessary
def lastMyInjectableParameterIndex = parameters*.value.max()
lastMyInjectableParameterIndex = lastMyInjectableParameterIndex == null ?
                                 0 :
                                 lastMyInjectableParameterIndex + 1
if(invocation.arguments.length < lastMyInjectableParameterIndex) {
  def newArguments = new Object[lastMyInjectableParameterIndex]
  System.arraycopy invocation.arguments, 0, newArguments, 0, invocation.arguments.length
  invocation.arguments = newArguments
}

parameters.each { parameter, i ->
  invocation.arguments[i] = new MyInjectable(parameter)
}|
Note
|
When using data driven features (methods with a
Data Driven Feature with Injected Parameter
|
Modules
Guice Module
With Spock 1.2 detached mocks are automatically attached to the Specification if they are injected via @Inject.
Spring Module
The Spring module enables integration with Spring TestContext Framework.
It supports the following spring annotations @ContextConfiguration and @ContextHierarchy. Furthermore, it supports the meta-annotation @BootstrapWith and so any annotation that is annotated with @BootstrapWith will also work, such as @SpringBootTest, @WebMvcTest.
Mocks
Spock 1.1 introduced the DetachedMockFactory and the SpockMockFactoryBean which allow the creation of Spock mocks outside of a specification.
|
Note
|
Although the mocks can be created outside of a specification, they only work properly inside the scope of a specification.
All interactions with them until they are attached to one, are handled by the default behavior and not recorded.
Furthermore, mocks can only be attached to one Specification instance at a time so keep that in mind when using multi-threaded executions
|
Java Config
class DetachedJavaConfig {
  def mockFactory = new DetachedMockFactory()

  @Bean
  GreeterService serviceMock() {
    return mockFactory.Mock(GreeterService)
  }

  @Bean
  GreeterService serviceStub() {
    return mockFactory.Stub(GreeterService)
  }

  @Bean
  GreeterService serviceSpy() {
    return mockFactory.Spy(GreeterServiceImpl)
  }

  @Bean
  FactoryBean<GreeterService> alternativeMock() {
    return new SpockMockFactoryBean(GreeterService)
  }
}
XML
Spock has spring namespace support, so if you declare the spock namespace with xmlns:spock="http://www.spockframework.org/spring" you get access to the convenience functions for creating mocks.
<?xml version="1.0" encoding="UTF-8"?>
<beans xmlns="http://www.springframework.org/schema/beans"
       xmlns:xsi="http://www.w3.org/2001/XMLSchema-instance"
       xmlns:spock="http://www.spockframework.org/spring"
       xsi:schemaLocation="http://www.springframework.org/schema/beans
           http://www.springframework.org/schema/beans/spring-beans.xsd
           http://www.spockframework.org/spring http://www.spockframework.org/spring/spock.xsd">

  <spock:mock id="serviceMock" class="org.spockframework.spring.docs.GreeterService"/>   (1)
  <spock:stub id="serviceStub" class="org.spockframework.spring.docs.GreeterService"/>   (2)
  <spock:spy id="serviceSpy" class="org.spockframework.spring.docs.GreeterServiceImpl"/> (3)

  <bean id="someExistingBean" class="java.util.ArrayList"/>                              (4)
  <spock:wrapWithSpy ref="someExistingBean"/>                                            (4)

  <bean id="alternativeMock" class="org.spockframework.spring.xml.SpockMockFactoryBean"> (5)
    <constructor-arg value="org.spockframework.spring.docs.GreeterService"/>
    <property name="mockNature" value="MOCK"/>                                           (6)
  </bean>


</beans>-
Creates a
Mock -
Creates a
Stub -
Creates a
Spy -
Wraps an existing bean with a
Spy. Fails fast if referenced bean is not found. -
If you don’t want to use the special namespace support you can create the beans via the
SpockMockFactoryBean -
The
mockNaturecan beMOCK,STUB, orSPYand defaults toMOCKif not declared.
Usage
To use the mocks just inject them like any other bean and configure them as usual.
@Autowired @Named('serviceMock')
GreeterService serviceMock

@Autowired @Named('serviceStub')
GreeterService serviceStub

@Autowired @Named('serviceSpy')
GreeterService serviceSpy

@Autowired @Named('alternativeMock')
GreeterService alternativeMock

def "mock service"() {
  when:
  def result = serviceMock.greeting

  then:
  result == 'mock me'
  1 * serviceMock.getGreeting() >> 'mock me'
}

def "sub service"() {
  given:
  serviceStub.getGreeting() >> 'stub me'

  expect:
  serviceStub.greeting == 'stub me'
}

def "spy service"() {
  when:
  def result = serviceSpy.greeting

  then:
  result == 'Hello World'
  1 * serviceSpy.getGreeting()
}

def "alternatice mock service"() {
  when:
  def result = alternativeMock.greeting

  then:
  result == 'mock me'
  1 * alternativeMock.getGreeting() >> 'mock me'
}
Annotation driven
Spock 1.2 adds support for exporting mocks from a Specification into an ApplicationContext. This was inspired by
Spring Boot’s @MockBean(realised via Mockito) but adapted to fit into Spock style. It does not require any Spring Boot dependencies,
however it requires Spring Framework 4.3.5 or greater to work.
Using @SpringBean
Registers mock/stub/spy as a spring bean in the test context.
To use @SpringBean you have to use a strongly typed field def or Object won’t work. You also need to directly assign the
Mock/Stub/Spy to the field using the standard Spock syntax. You can even use the initializer blocks to define common behavior,
however they are only picked up once they are attached to the Specification.
@SpringBean definitions can replace existing Beans in your ApplicationContext.
|
Note
|
Spock’s @SpringBean actually creates a proxy in the ApplicationContext which forwards everything to the current
mock instance. The type of the proxy is determined by the type of the annotated field.
The proxy attaches itself to the current mock in the setup phase, that is why the mock must be created when the field is initialized. |
@SpringBean
Service1 service1 = Mock()

@SpringBean
Service2 service2 = Stub() {
  generateQuickBrownFox() >> "blubb"
}

def "injection with stubbing works"() {
  expect:
  service2.generateQuickBrownFox() == "blubb"
}

def "mocking works was well"() {
  when:
  def result = service1.generateString()

  then:
  result == "Foo"
  1 * service1.generateString() >> "Foo"
}|
Caution
|
As with Spring’s own @MockBean this will modify your ApplicationContext, and will create an unique context for your
Specification preventing it from being reused by Spring’s
Context Caching
outside of the current Specification.
If you are using a small context this won’t matter much, but if it is a heavy context you might want to use the other approaches, e.g., using the DetachedMockFactory.
|
Using @SpringSpy
If you want to spy on an existing bean, you can use the @SpringSpy annotation to wrap the bean in a spy.
As with @SpringBean the field must be of the type you want to spy on, however you cannot use an initializer.
@SpringSpy
Service2 service2

@Autowired
Service1 service1

def "default implementation is used"() {
  expect:
  service1.generateString() == "The quick brown fox jumps over the lazy dog."
}

def "mocking works was well"() {
  when:
  def result = service1.generateString()

  then:
  result == "Foo"
  1 * service2.generateQuickBrownFox() >> "Foo"
}
Using @StubBeans
@StubBeans registers plain Stub instances in an ApplicationContext.
Use this if you just need to satisfy some dependencies without actually doing anything with these stubs.
If you need to control the stubs, e.g., configure return values then use @SpringBean instead.
Like @SpringBean @StubBeans also replaced existing BeanDefinitions,so you can use it to remove real beans from an ApplicationContext.
@StubBeans can be replaced by @SpringBean, this can be useful if you need to replace some @StubBeans defined in a parent class.
@StubBeans(Service2)
@ContextConfiguration(classes = DemoMockContext)
class StubBeansExamples extends Specification {
Spring Boot
The recommended way to use Spock mocks in @WebMvcTest or other @SpringBootTest-style tests,
is to use the @SpringBean and @SpringSpy annotations as shown above.
Alternatively you can use an embedded config annotated with @TestConfiguration and to create the mocks using the DetachedMockFactory.
@WebMvcTest
class WebMvcTestIntegrationSpec extends Specification {

  @Autowired
  MockMvc mvc

  @Autowired
  HelloWorldService helloWorldService

  def "spring context loads for web mvc slice"() {
    given:
    helloWorldService.getHelloMessage() >> 'hello world'

    expect: "controller is available"
    mvc.perform(MockMvcRequestBuilders.get("/"))
      .andExpect(status().isOk())
      .andExpect(content().string("hello world"))
  }

  @TestConfiguration
  static class MockConfig {
    def detachedMockFactory = new DetachedMockFactory()

    @Bean
    HelloWorldService helloWorldService() {
      return detachedMockFactory.Stub(HelloWorldService)
    }
  }
}
For more examples see the specs in the codebase and boot examples.
Scopes
Spock ignores bean that is not a singleton (in the singleton scope) by default. To enable mocks to work for scoped beans
you need to add @ScanScopedBeans to the spec and make sure that the scope allows access to the bean during the setup phase.
|
Note
|
The request and session scope will throw exceptions by default, if there is no active request/session.
|
You can limit the scanning to certain scopes by using the value property of @ScanScopedBeans.
Grails Module
The Grails plugin has moved to its own GitHub project.
|
Note
|
Grails 2.3 and higher have built-in Spock support and do not require a plugin. |
Release Notes
1.3 (2019-03-05)
No functional changes
1.3-RC1 (2019-01-22)
The theme for this release is to increase the information that is provided when an assertion failed.
Potential breaking changes
code argument constraints are treated as implicit assertions
Before this release the code argument constrains worked by returning a boolean result.
This was fine if you just wanted to do a simple comparison, but it breaks down if you
need to do 5 comparisons. Users also often assumed that it worked like the assertions in
then blocks and didn’t add && to chain multiple assertions together, so their constraint
ignored all before the next line.
1 * mock.foo( { it.size() > 1
                it[0].length == 2 })
This would only use the length comparison, to make it work you had to add &&.
Another problem arises by having more than one comparison inside the constraints,
you don’t know which of the 5 comparisons failed. If you just expected one method
call you could use an explicit assert as a workaround, but since it immediately
breaks, you can’t use it if you want to have multiple different calls to the same
mock.
With 1.3 the above code will actually work as intended, and even more important it will give actual feedback what didn’t match.
So what can break?
If you used the code argument constraint as a way of capturing the argument value, then this will most likely not work anymore, since assignments to already declared variables are forbidden in implicit assertion block. If you still need access to the argument, you can use the response generator closure instead.
def extern = null

1 * mock.foo( { extern = it; it.size() > 0 })  // old
1 * mock.foo( { it.size() > 0 }) >> { extern = it[0] } // new
The added benefit of this changes is, that it clearly differentiates the condition from the capture.
Another consequence of the change is, that the empty {} assertion block will now pass
instead of fail, since no assertion error is being treated as passing, while it required
a true result beforehand.
It is advised, that if you have multiple conditions joined by &&, that you remove
it to get individual assertions reports instead of a large joined block.
assertions with explicit messages now include power assertions output.
def a = 1
def b = 2
assert a == b : "Additional message"a == b Additional message
a == b
| |  |
1 |  2
  false

Additional message
If you relied on this behavior to hide some output, or to prevent a stack overflow due to a self referenceing data structure, then you need to move the condition into a separate method that just returns the boolean result.
What’s New In This release
-
Add implicit assertions for CodeArgument constraints (#956)
-
Add power assertion output to asserts with explicit message (#928)
-
Add support for mixed named and positional arguments in mocks (#919)
-
Add NamedParam support for groovy-2.5 with backport to 2.4 (#921)
-
Add special rendering for Set comparisons (#925)
-
Add identity hash code to type hints in comparison failures if they are identical
-
Fix erroneous regex where an optional colon was defined instead of a non-capturing group (#931)
-
Improve CodeArgumentConstraint by supporting assertions (#918)
-
Improve IDE type inference in MockingApi (#920)
-
Improve reporting of TooFewInvocationsError (#912)
-
Improve render class loader for classes in comparison failures (#932)
-
Improve record class literal values to display FQCN in comparison failures (#935)
-
Improve filter Java 9+ reflection stack frames
-
Improve show stacktrace of throwables in comparison failure result
-
Improve use canonical class name in comparison failure results if present
-
Improve render otherwise irrelevant expressions if they get a type hint in comparison failure (#936)
-
Fix do not convert implicit "this" expression like when calling the constructor of a non-static inner class (#930)
-
Fix class expression recording when there are comments with dots in the same line (#937)
Thanks to all the contributors to this release: Björn Kautler, Marc Philipp, Marcin Zajączkowski, Martin Vseticka, Michael Kutz, Kacper Bublik
1.2 (2018-09-23)
Breaking Changes: Spock 1.2 drops support for Java 6, Groovy 2.0 and Groovy 2.3
What’s New In This release
-
Add Groovy 2.5.0 Variant for better Java 10+ Support
-
Add
@SpringBeanand@SpringSpyinspired by@MockBean, Also add@StubBeans(Docs) -
Add
@UnwrapAopProxyto make automatically unwrap SpringAopProxie -
Add
@AutoAttachextension (Docs) -
Add
@Retryextension (Docs) -
Add flag to UnrollNameProvider to assert unroll expressions (set the system property
spock.assertUnrollExpressionstotrue) (#767) -
Add automatic module name descriptors for Java 9
-
Add configurable
conditionto@Retryextension to allow for customizing when retries should be attempted (Docs) -
Improve
@PendingFeatureto now have an optionalreasonattribute (#907) -
Improve
@Retryto be declarable on a spec class which will apply it to all feature methods in that class and subclasses (Docs) -
Improve StepwiseExtension mark only subsequent features as skipped in case of failure (#893)
-
Improve in assertions Spock now uses
DefaultGroovyMethods.dumpinstead oftoStringif a class doesn’t override the defaultObject.toString. -
Improve
verifyAllcan now also have a target same aswith -
Improve static type hints for
verifyAllandwith -
Improve reporting of exceptions during cleanup, they are now properly reported as suppressed exceptions instead of hiding the real exception
-
Improve default responses for stubs, Java 8 types like
OptionalandStreamsnow return empty,CompleteableFuturecompletes withnullresult -
Improve support for builder pattern, stubs now return themselves if the return type matches the type of the stub
-
Improve tapestry support with by supporting
@ImportModule -
Improve
constructorArgsfor spies can now accept a map directly without the need to wrap it in a list -
Improve Guice Module now automatically attaches detached mocks
-
Improve unmatched mock messages by using
dumpinstead ofinspectfor classes which don’t provide a customtoString -
Improve spying on concrete instances to enable partial mocking
-
Fix use String renderer for Class instances (#909)
-
Fix mark new Spring extensions as @Beta (#890)
-
Fix exclude groovy-groovysh from compile dependencies (#882)
-
Fix
Retry.Mode.FEATUREandRetry.Mode.SETUP_FEATURE_CLEANUPto make a test pass if a retry was successful. -
Fix issue with
@SpringBeanmocks throwingInvocationTargetExceptioninstead of actual declared exceptions (#878, #887) -
Fix void methods with implicit targets failing in
withandverifyAll(#886) -
Fix SpockAssertionErrors and its subclasses now are properly
Serializeable -
Fix Spring injection of JUnit Rules, due to the changes in 1.1 the rules where initialized before Spring could inject them, this has been fixed by performing the injection earlier in the process
-
Fix SpringMockTestExecutionListener initializes lazy beans
-
Fix OSGi Import-Package header
-
Fix re-declare recorder variables (#783), this caused annotations such as
@Slf4jto break Specifications -
Fix MissingFieldException in DiffedObjectAsBeanRenderer
-
Fix problems with nested
withandverifyAllmethod calls -
Fix assertion of mock invocation order with nested invocations (#475)
-
Fix ignore inferred type for Spies on existing instance
-
General dependency update
Thanks to all the contributors to this release: Marc Philipp, Rob Elliot, jochenberger, Jan Papenbrock, Paul King, Marcin Zajączkowski, mrb-twx, Alexander Kazakov, Serban Iordache, Xavier Fournet, timothy-long, John Osberg, AlexElin, Benjamin Muschko, Andreas Neumann, geoand, Burk Hufnagel, signalw, Martin Vseticka, Tilman Ginzel
1.2-RC3 (2018-09-16)
What’s New In This release
-
Add support for Java 11+ (#895, #902, #903)
-
Improve
@PendingFeatureto now have an optionalreasonattribute (#907) -
Fix use String renderer for Class instances (#909)
-
Fix mark new Spring extensions as @Beta (#890)
-
Fix exclude groovy-groovysh from compile dependencies (#882)
Thanks to all the contributors to this release: Marc Philipp, Marcin Zajączkowski, signalw
1.2-RC2 (2018-09-04)
What’s New In This release
-
Add configurable
conditionto@Retryextension to allow for customizing when retries should be attempted (Docs) -
Fix
Retry.Mode.FEATUREandRetry.Mode.SETUP_FEATURE_CLEANUPto make a test pass if a retry was successful. -
Improve
@Retryto be declarable on a spec class which will apply it to all feature methods in that class and subclasses (Docs) -
Improve StepwiseExtension mark only subsequent features as skipped in case of failure (#893)
-
Fix issue with
@SpringBeanmocks throwingInvocationTargetExceptioninstead of actual declared exceptions (#878, #887) -
Fix void methods with implicit targets failing in
withandverifyAll(#886)
Thanks to all the contributors to this release: Marc Philipp, Tilman Ginzel, Marcin Zajączkowski, Martin Vseticka
1.2-RC1 (2018-08-14)
Breaking Changes: Spock 1.2 drops support for Java 6, Groovy 2.0 and Groovy 2.3
What’s New In This release
-
Add Groovy 2.5.0 Variant for better Java 10 Support
-
Add @SpringBean and @SpringSpy inspired by @MockBean, Also add @StubBeans
-
Add @UnwrapAopProxy to make automatically unwrap SpringAopProxie
-
Add flag to UnrollNameProvider to assert unroll expressions (set the system property
spock.assertUnrollExpressionstotrue) #767 -
Add automatic module name descriptors for Java 9
-
Add
@AutoAttachextension (Docs) -
Add
@Retryextension (Docs) -
Fix SpockAssertionErrors and its subclasses now are properly
Serializeable -
Fix Spring injection of JUnit Rules, due to the changes in 1.1 the rules where initialized before Spring could inject them, this has been fixed by performing the injection earlier in the process
-
Fix SpringMockTestExecutionListener initializes lazy beans
-
Fix OSGi Import-Package header
-
Fix re-declare recorder variables (#783), this caused annotations such as
@Slf4jto break Specifications -
Fix MissingFieldException in DiffedObjectAsBeanRenderer
-
Fix problems with nested
withandverifyAllmethod calls -
Fix assertion of mock invocation order with nested invocations (#475)
-
Fix ignore inferred type for Spies on existing instance
-
Improve in assertions Spock now uses
DefaultGroovyMethods.dumpinstead oftoStringif a class doesn’t override the defaultObject.toString. -
Improve
verifyAllcan now also have a target same aswith -
Improve static type hints for
verifyAllandwith -
Improve reporting of exceptions during cleanup, they are now properly reported as suppressed exceptions instead of hiding the real exception
-
Improve default responses for stubs, Java 8 types like
OptionalandStreamsnow return empty,CompleteableFuturecompletes withnullresult -
Improve support for builder pattern, stubs now return themselves if the return type matches the type of the stub
-
Improve tapestry support with by supporting
@ImportModule -
Improve
constructorArgsfor spies can now accept a map directly without the need to wrap it in a list -
Improve Guice Module now automatically attaches detached mocks
-
Improve unmatched mock messages by using
dumpinstead ofinspectfor classes which don’t provide a customtoString -
Improve spying on concrete instances to enable partial mocking
-
General dependency update
Thanks to all the contributors to this release: Rob Elliot, jochenberger, Jan Papenbrock, Paul King, Marcin Zajączkowski, mrb-twx, Alexander Kazakov, Serban Iordache, Xavier Fournet, timothy-long, John Osberg, AlexElin, Benjamin Muschko, Andreas Neumann, geoand, Burk Hufnagel
Known Issues
-
Groovy 2.4.10 introduced a bug that interfered with the way
verifyAllworks, it has been fixed in 2.4.12
1.1 (2017-05-01)
What’s New In This release
-
Update docs to include info/examples for Spying instantiated objects
-
Fix integer overflow that could occur when the OutOfMemoryError protection while comparing huge strings kicked in
-
Improve rendering for OutOfMemoryError protection
1.1-rc-4 (2017-03-28)
This should be the last rc for 1.1
What’s New In This release
-
15 merged pull requests
-
Spies can now be created with an already existing target
-
Fix for scoped Spring Beans
-
Fix incompatibility with Spring 2/3 that was introduced in 1.1-rc-1
-
Fix groovy compatibility
-
Fix ByteBuddy compatibility
-
Fix OutOfMemoryError when comparing huge strings
-
Improve default response for
java.util.Optional<T>, will now return empty optional -
Improve detection of Spring Boot tests
-
Improve documentation for global extensions
Thanks to all the contributors to this release: Taylor Wicksell, Rafael Winterhalter, Marcin Zajączkowski, Eduardo Grajeda, Paul King, Andrii, Björn Kautler, Libor Rysavy
Known issues with groovy 2.4.10 which breaks a smoke test, but should have little impact on normal use (#709).
1.1-rc-3 (released 2016-10-17)
Adds compatibility with ByteBuddy as an alternative to cglib for generating mocks and stubs for classes.
1.1-rc-2 (released 2016-08-22)
1.1 should be here soon but in the meantime there’s a new release candidate.
What’s New In This release
-
Support for the new test annotations in Spring Boot 1.4.
-
Fixed the integration of JUnit method rules which now correctly happen "outside" the
setup/cleanupmethods.
Thanks to all the contributors to this release: Jochen Berger, Leonard Brünings, Mariusz Gilewicz, Tomasz Juchniewicz, Gamal Mateo, Tobias Schulte, Florian Wilhelm, Kevin Wittek
1.1-rc-1 (released 2016-06-30)
A number of excellent pull requests have been integrated into the 1.1 stream. Currently some features are incubating. We encourage users to try out these new features and provide feedback so we can finalize the content for a 1.1 release.
What’s New In This release
-
44 merged pull requests
-
The
verifyAllmethod can be used to assert multiple boolean expressions without short-circuiting those after a failure. For example:
then:
verifyAll {
  a == b
  b == c
}
-
Detached mocks via the
DetachedMockFactoryandSpockMockFactoryBeanclasses see the Spring Module Docs. -
Cells in a data table can refer to the current value for a column to the left.
-
Spycan be used to create partial mocks for Java 8 interfaces withdefaultmethods just as it can for abstract classes. -
Improved power assert output when an exception occurs evaluating an assertion.
-
A new
@PendingFeatureannotation to distinguish incomplete functionality from features with@Ignore.
Special thanks to all the contributors to this release: Dmitry Andreychuk, Aseem Bansal, Daniel Bechler, Fedor Bobin, Leonard Brünings, Leonard Daume, Marcin Erdmann, Jarl Friis, Søren Berg Glasius, Serban Iordache, Michal Kordas, Pap Lőrinc, Vlad Muresan, Etienne Neveu, Glyn Normington, David Norton, Magnus Palmér, Gus Power, Oliver Reissig, Kevin Wittek and Marcin Zajączkowski
1.0 (released 2015-03-02)
1.0 has arrived! Finally (and some years late) the version number communicates what Spock users have known for ages - that Spock isn’t only useful and fun, but also reliable, mature, and here to stay. So please, go out and tell everyone who hasn’t been assimilated that now is the time to join the party!
A special thanks goes to all our tireless speakers and supporters, only a few of which are listed here: Andres Almiray, Cédric Champeau, David Dawson, Rob Fletcher, Sean Gilligan, Ken Kousen, Guillaume Laforge, NFJS Tour, Graeme Rocher, Baruch Sadogursky, Odin Hole Standal, Howard M. Lewis Ship, Ken Sipe, Venkat Subramaniam, Russel Winder.
What’s New In This Release
-
17 contributors, 21 resolved issues, 18 merged pull requests, some ongoing work. No ground-breaking new features, but significant improvements and fixes across the board.
-
Minimum runtime requirements raised to JRE 1.6 and Groovy 2.0.
-
Improved and restyled reference documentation at http://docs.spockframework.org. Generated with Asciidoctor (what else?).
-
Maven plugin removed. Just let Maven Surefire run your Spock specs like your JUnit tests (see spock-example project).
-
Official support for Java 1.8, Groovy 2.3 and Groovy 2.4. Make sure to pick the
groovy-2.0binaries for Groovy 2.0/2.1/2.2,groovy-2.3binaries for Groovy 2.3, andgroovy-2.4binaries for Groovy 2.4 and higher. -
Improved infrastructure to allow for easier community involvement: Switch to GitHub issue tracker, Windows and Linux CI builds, pull requests automatically tested, all development on
masterbranch (bye-byegroovy-x.ybranches!).
Other News
-
Follow our new Twitter account
-
Try these new third-party extensions
-
Check out the upcoming Java Testing with Spock book from Manning
What’s Up Next?
With a revamped build/release process and a reforming core team, we hope to release much more frequently from now on. Another big focus will be to better involve the community and their valuable contributions. Last but not least, we are finally shooting for a professional logo and website. Stay tuned for announcements!
Test Long And Prosper,
The Spock Team
Contributors
17 awesome people contributed to this release:
Resolved Issues
21 burning issues were fixed:
-
Closure used as data value in where-block can’t be called with method syntax
-
Reflect subsequent filtering/sorting in a spec’s JUnit description
-
Data values in where-block are not resolved in nested closures
-
spock-maven:0.7-groovy-2.0 has an invalid descriptor (and a workaround for this)
-
Provide a Specification.with() overload that states the expected target type
-
spock-tapestry should support @javax.inject.Inject and @InjectService
Merged Pull Requests
18 hand-crafted pull requests were merged or cherry-picked:
-
Minor documentation corrections: spelling, code examples. README.md corr…
-
added manifest to core.gradle to allow spock core to work in OSGi land
-
Closure used as data value in where-block can’t be called with method syntax
-
Added docs for Stepwise, Timeout, Use, ConfineMetaClassChanges, AutoClea…
-
Add groovy console support for the specs project, to ease debugging of the AST.
-
Update spock-report/src/test/groovy/org/spockframework/report/sample/Fig…
-
spock-tapestry: added support for @InjectService, @javax.inject.Inject
-
Support overriding Junit After*/Before* methods in the derived class(
New Third Party Extensions
These awesome extensions have been published or updated:
Ongoing Work
These great features didn’t make it into this release (but hopefully the next!):
0.7 (released 2012-10-08)
Snapshot Repository Moved
Spock snapshots are now available from https://oss.sonatype.org/content/repositories/snapshots/org/spockframework/.
New Reference Documentation
The new Spock reference documentation is available at http://docs.spockframework.org. It will gradually replace the documentation at http://wiki.spockframework.org. Each Spock version is documented separately (e.g. http://docs.spockframework.org/en/spock-0.7-groovy-1.8). Documentation for the latest Spock snapshot is at http://docs.spockframework.org/en/latest. As of Spock 0.7, the chapters on Data Driven Testing and Interaction Based Testing are complete.
Improved Mocking Failure Message for TooManyInvocationsError
The diagnostic message accompanying a TooManyInvocationsError has been greatly improved.
Here is an example:
Too many invocations for:

3 * person.sing(_)   (4 invocations)

Matching invocations (ordered by last occurrence):

2 * person.sing("do")   <-- this triggered the error
1 * person.sing("re")
1 * person.sing("mi")
Improved Mocking Failure Message for TooFewInvocationsError
The diagnostic message accompanying a TooFewInvocationsError has been greatly improved.
Here is an example:
Too few invocations for:

1 * person.sing("fa")   (0 invocations)

Unmatched invocations (ordered by similarity):

1 * person.sing("re")
1 * person.say("fa")
1 * person2.shout("mi")
Stubs
Besides mocks, Spock now has explicit support for stubs:
def person = Stub(Person)A stub is a restricted form of mock object that responds to invocations without ever demanding them. Other than not having a cardinality, a stub’s interactions look just like a mock’s interactions. Using a stub over a mock is an effective way to communicate its role to readers of the specification.
Spies
Besides mocks, Spock now has support for spies:
def person = Spy(Person, constructorArgs: ["Fred"])A spy sits atop a real object, in this example an instance of class Person. All invocations on the spy
that don’t match an interaction are delegated to that object. This allows to listen in on and selectively
change the behavior of the real object. Furthermore, spies can be used as partial mocks.
Declaring Interactions at Mock Creation Time
Interactions can now be declared at mock creation time:
def person = Mock(Person) {
    sing() >> "tra-la-la"
    3 * eat()
}
This feature is particularly attractive for Stubs.
Groovy Mocks
Spock now offers specialized mock objects for spec’ing Groovy code:
def mock = GroovyMock(Person)
def stub = GroovyStub(Person)
def spy = GroovySpy(Person)
A Groovy mock automatically implements groovy.lang.GroovyObject. It allows stubbing and mocking
of dynamic methods just like for statically declared methods. When a Groovy mock is called from Java
rather than Groovy code, it behaves like a regular mock.
Global Mocks
A Groovy mock can be made global:
GroovySpy(Person, global: true)A global mock can only be created for a class type. It effectively replaces all instances of that type and makes them
amenable to stubbing and mocking. (You may know this behavior from Groovy’s MockFor and StubFor facilities.)
Furthermore, a global mock allows mocking of the type’s constructors and static methods.
Grouping Conditions with Same Target Object
Inspired from Groovy’s Object.with method, the Specification.with method allows to group conditions
involving the same target object:
def person = new Person(name: "Fred", age: 33, sex: "male")

expect:
with(person) {
    name == "Fred"
    age == 33
    sex == "male"
}
Grouping Interactions with Same Target Object
The with method can also be used for grouping interactions:
def service = Mock(Service)
app.service = service

when:
app.run()

then:
with(service) {
    1 * start()
    1 * act()
    1 * stop()
}Polling Conditions
spock.util.concurrent.PollingConditions joins AsyncConditions and BlockingVariable(s) as another utility for
testing asynchronous code:
def person = new Person(name: "Fred", age: 22)
def conditions = new PollingConditions(timeout: 10)

when:
Thread.start {
    sleep(1000)
    person.age = 42
    sleep(5000)
    person.name = "Barney"
}

then:
conditions.within(2) {
    assert person.age == 42
}

conditions.eventually {
    assert person.name == "Barney"
}
Experimental DSL Support for Eclipse
Spock now ships with a DSL descriptor that lets Groovy Eclipse better understand certain parts of Spock’s DSL. The descriptor is automatically detected and activated by the IDE. Here is an example:
// currently need to type variable for the following to work
Person person = new Person(name: "Fred", age: 42)

expect:
with(person) {
    name == "Fred" // editor understands and auto-completes 'name'
    age == 42      // editor understands and auto-completes 'age'
}
Another example:
def person = Stub(Person) {
    getName() >> "Fred" // editor understands and auto-completes 'getName()'
    getAge() >> 42      // editor understands and auto-completes 'getAge()'
}
DSL support is activated for Groovy Eclipse 2.7.1 and higher. If necessary, it can be deactivated in the Groovy Eclipse preferences.
Experimental DSL Support for IntelliJ IDEA
Spock now ships with a DSL descriptor that lets Intellij IDEA better understand certain parts of Spock’s DSL. The descriptor is automatically detected and activated by the IDE. Here is an example:
def person = new Person(name: "Fred", age: 42)

expect:
with(person) {
    name == "Fred" // editor understands and auto-completes 'name'
    age == 42      // editor understands and auto-completes 'age'
}
Another example:
def person = Stub(Person) {
    getName() >> "Fred" // editor understands and auto-completes 'getName()'
    getAge() >> 42      // editor understands and auto-completes 'getAge()'
}
DSL support is activated for IntelliJ IDEA 11.1 and higher.
Splitting up Class Specification
Parts of class spock.lang.Specification were pulled up into two new super classes: spock.lang.MockingApi
now contains all mocking-related methods, and org.spockframework.lang.SpecInternals contains internal methods
which aren’t meant to be used directly.
Improved Failure Messages for notThrown and noExceptionThrown
Instead of just passing through exceptions, Specification.notThrown and Specification.noExceptionThrown
now fail with messages like:
Expected no exception to be thrown, but got 'java.io.FileNotFoundException'

Caused by: java.io.FileNotFoundException: ...
HamcrestSupport.expect
Class spock.util.matcher.HamcrestSupport has a new expect method that makes
Hamcrest assertions read better in then-blocks:
when:
def x = computeValue()

then:
expect x, closeTo(42, 0.01)
@Beta
Recently introduced classes and methods may be annotated with @Beta, as a sign that they may still undergo incompatible
changes. This gives us a chance to incorporate valuable feedback from our users. (Yes, we need your feedback!) Typically,
a @Beta annotation is removed within one or two releases.
Fixed Issues
See the issue tracker for a list of fixed issues.
0.6 (released 2012-05-02)
Mocking Improvements
The mocking framework now provides better diagnostic messages in some cases.
Multiple result declarations can be chained. The following causes method bar to throw an IOException when first called,
return the numbers one, two, and three on the next calls, and throw a RuntimeException for all subsequent calls:
foo.bar() >> { throw new IOException() } >>> [1, 2, 3] >> { throw new RuntimeException() }It’s now possible to match any argument list (including the empty list) with foo.bar(*_).
Method arguments can now be constrained with Hamcrest matchers:
import static spock.util.matcher.HamcrestMatchers.closeTo

...

1 * foo.bar(closeTo(42, 0.001))
Extended JUnit Rules Support
In addition to rules implementing org.junit.rules.MethodRule (which has been deprecated in JUnit 4.9), Spock now also
supports rules implementing the new org.junit.rules.TestRule interface. Also supported is the new @ClassRule
annotation. Rule declarations are now verified and can leave off the initialization part. I that case Spock will
automatically initialize the rule by calling the default constructor. The @TestName rule, and rules in general, now
honor the @Unroll annotation and any defined naming pattern.
See Issue 240 for a known limitation with Spock’s TestRule support.
Condition Rendering Improvements
When two objects are compared with the == operator, they are unequal, but their string representations are the same,
Spock will now print the objects' types:
enteredNumber == 42
|             |
|             false
42 (java.lang.String)
JUnit Fixture Annotations
Fixture methods can now be declared with JUnit’s @Before, @After, @BeforeClass, and @AfterClass annotations,
as an addition or alternative to Spock’s own fixture methods. This was particularly needed for Grails 2.0 support.
Tapestry 5.3 Support
Thanks to a contribution from Howard Lewis Ship, the Tapestry module is now compatible with Tapestry 5.3. Older 5.x versions are still supported.
IBM JDK Support
Spock now runs fine on IBM JDKs, working around a bug in the IBM JDK’s verifier.
Improved JUnit Compatibility
org.junit.internal.AssumptionViolatedException is now recognized and handled as known from JUnit. @Unrolled methods
no longer cause "yellow" nodes in IDEs.
Improved @Unroll
The @Unroll naming pattern can now be provided in the method name, instead of as an argument to the annotation:
@Unroll
def "maximum of #a and #b is #c"() {
    expect:
    Math.max(a, b) == c

    where:
    a | b | c
    1 | 2 | 2
}
The naming pattern now supports property access and zero-arg method calls:
@Unroll
def "#person.name.toUpperCase() is #person.age years old"() { ... }
The @Unroll annotation can now be applied to a spec class. In this case, all data-driven feature methods in the class
will be unrolled.
Improved @Timeout
The @Timeout annotation can now be applied to a spec class. In this case, the timeout applies to all feature methods
(individually) that aren’t already annotated with @Timeout. Timed methods are now executed on the regular test
framework thread. This can be important for tests that rely on thread-local state (like Grails integration tests).
Also the interruption behavior has been improved, to increase the chance that a timeout can be enforced.
The failure exception that is thrown when a timeout occurs now contains the stacktrace of test execution, allowing you to see where the test was “stuck” or how far it got in the allocated time.
Improved Data Table Syntax
Table cells can now be separated with double pipes. This can be used to visually set apart expected outputs from provided inputs:
...
where:
a | b || sum
1 | 2 || 3
3 | 1 || 4
Groovy 1.8/2.0 Support
Spock 0.6 ships in three variants for Groovy 1.7, 1.8, and 2.0. Make sure to pick the right version - for example, for Groovy 1.8 you need to use spock-core-0.6-groovy-1.8 (likewise for all other modules). The Groovy 2.0 variant is based on Groovy 2.0-beta-3-SNAPSHOT and only available from http://m2repo.spockframework.org. The Groovy 1.7 and 1.8 variants are also available from Maven Central. The next version of Spock will no longer support Groovy 1.7.
Grails 2.0 Support
Spock’s Grails plugin was split off into a separate project and now lives at http://github.spockframework.org/spock-grails. The plugin supports both Grails 1.3 and 2.0.
The Spock Grails plugin supports all of the new Grails 2.0 test mixins, effectively deprecating the existing unit testing classes (e.g. UnitSpec). For integration testing, IntegrationSpec must still be used.
IntelliJ IDEA Integration
The folks from JetBrains have added a few handy features around data tables. Data tables will now be layed out automatically when reformatting code. Data variables are no longer shown as "unknown" and have their types inferred from the values in the table (!).
GitHub Repository
All source code has moved to http://github.spockframework.org/. The Grails Spock plugin, Spock Example project, and Spock Web Console now have their own GitHub projects. Also available are slides and code for various Spock presentations (such as this one).
Gradle Build
Spock is now exclusively built with Gradle. Building Spock yourself is as easy as cloning the
Github repo and executing gradlew build. No build tool installation is
required; the only prerequisite for building Spock is a JDK installation (1.5 or higher).
Fixed Issues
See the issue tracker for a list of fixed issues.
Migration Guide
This page explains incompatible changes between successive versions and provides suggestions on how to deal with them.
1.0
Specs, Spec base classes and third-party extensions may have be recompiled in order to work with Spock 1.0.
JRE 1.5 and Groovy versions below 2.0 are no longer supported.
Make sure to pick the right binaries for your Groovy version of choice: groovy-2.0 for Groovy 2.0/2.1/2.2,
groovy-2.3 for Groovy 2.3, and groovy-2.4 for Groovy 2.4 and higher. Spock won’t let you run with a "wrong" version.
No known source incompatible changes.
0.7
Client code must be recompiled in order to work with Spock 0.7. This includes third-party Spock extensions and base classes.
No known source incompatible changes.
0.6
Class initialization order
|
Note
|
This only affects cases where one specification class inherits from another one. |
Given these specifications:
class Base extends Specification {
    def base1 = "base1"
    def base2

    def setup() { base2 = "base2" }
}

class Derived extends Base {
    def derived1 = "derived1"
    def derived2

    def setup() { derived2 = "derived2" }
}
In 0.5, above assignments happened in the order base1, base2, derived1, derived2. In other words, field
initializers were executed right before the setup method in the same class. In 0.6, assignments happen in the order
base1, derived1, base2, derived2. This is a more conventional order that solves a few problems that users
faced with the previous behavior, and also allows us to support JUnit’s new TestRule. As a result of this change,
the following will no longer work:
class Base extends Specification {
    def base

    def setup() { base = "base" }
}

class Derived extends Base {
    def derived = base + "derived" // base is not yet set
}
To overcome this problem, you can either use a field initializer for base, or move the assignment of derived into
a setup method.
@Unroll naming pattern syntax
|
Note
|
This is not a change from 0.5, but a change compared to 0.6-SNAPSHOT. |
|
Note
|
This only affects the Groovy 1.8 and 2.0 variants. |
In 0.5, the naming pattern was string based:
@Unroll("maximum of #a and #b is #c")
def "maximum of two numbers"() {
    expect:
    Math.max(a, b) == c

    where:
    a | b | c
    1 | 2 | 2
}
In 0.6-SNAPSHOT, this was changed to a closure returning a GString:
@Unroll({"maximum of $a and $b is $c"})
def "maximum of two numbers"() { ... }
For various reasons, the new syntax didn’t work out as we had hoped, and eventually we decided to go back to the string
based syntax. See Improved @Unroll for recent improvements to that syntax.
Hamcrest matcher syntax
|
Note
|
This only affects users moving from the Groovy 1.7 to the 1.8 or 2.0 variant. |
Spock offers a very neat syntax for using Hamcrest matchers:
import static spock.util.matcher.HamcrestMatchers.closeTo

...

expect:
answer closeTo(42, 0.001)
Due to changes made between Groovy 1.7 and 1.8, this syntax no longer works in as many cases as it did before. For example, the following will no longer work:
expect:
object.getAnswer() closeTo(42, 0.001)
To avoid such problems, use HamcrestSupport.that:
import static spock.util.matcher.HamcrestSupport.that

...

expect:
that answer, closeTo(42, 0.001)
A future version of Spock will likely remove the former syntax and strengthen the latter one.