Spock comes with a powerful extension mechanism, which allows to hook into a spec’s lifecycle to enrich or alter its behavior. In this chapter, we will first learn about Spock’s built-in extensions, and then dive into writing custom extensions.
Spock Configuration File
Some extensions can be configured with options in a Spock configuration file. The description for each extension will
mention how it can be configured. All those configurations are in a Groovy file that usually is called
SpockConfig.groovy. Spock first searches for a custom location given in a system property called spock.configuration
which is then used either as classpath location or if not found as file system location if it can be found there,
otherwise the default locations are investigated for a configuration file. Next it searches for the SpockConfig.groovy
in the root of the test execution classpath. If there is also no such file, you can at last have a SpockConfig.groovy
in your Spock user home. This by default is the directory .spock within your home directory, but can be changed using
the system property spock.user.home or if not set the environment property SPOCK_USER_HOME.
Stack Trace Filtering
You can configure Spock whether it should filter stack traces or not by using the configuration file. The default value
is true.
runner {
  filterStackTrace false
}
Built-In Extensions
Most of Spock’s built-in extensions are annotation-driven. In other words, they are triggered by annotating a
spec class or method with a certain annotation. You can tell such an annotation by its @ExtensionAnnotation
meta-annotation.
Ignore
To temporarily prevent a feature method from getting executed, annotate it with spock.lang.Ignore:
@Ignore
def "my feature"() { ... }
For documentation purposes, a reason can be provided:
@Ignore("TODO")
def "my feature"() { ... }
To ignore a whole specification, annotate its class:
@Ignore
class MySpec extends Specification { ... }
In most execution environments, ignored feature methods and specs will be reported as "skipped".
Care should be taken when ignoring feature methods in a spec class annotated with spock.lang.Stepwise since
later feature methods may depend on earlier feature methods having executed.
IgnoreRest
To ignore all but a (typically) small subset of methods, annotate the latter with spock.lang.IgnoreRest:
def "I'll be ignored"() { ... }

@IgnoreRest
def "I'll run"() { ... }

def "I'll also be ignored"() { ... }
@IgnoreRest is especially handy in execution environments that don’t provide an (easy) way to run a subset of methods.
Care should be taken when ignoring feature methods in a spec class annotated with spock.lang.Stepwise since
later feature methods may depend on earlier feature methods having executed.
IgnoreIf
To ignore a feature method under certain conditions, annotate it with spock.lang.IgnoreIf,
followed by a predicate:
@IgnoreIf({ System.getProperty("os.name").contains("windows") })
def "I'll run everywhere but on Windows"() { ... }
To make predicates easier to read and write, the following properties are available inside the closure:
-
sysA map of all system properties -
envA map of all environment variables -
osInformation about the operating system (seespock.util.environment.OperatingSystem) -
jvmInformation about the JVM (seespock.util.environment.Jvm)
Using the os property, the previous example can be rewritten as:
@IgnoreIf({ os.windows })
def "I'll run everywhere but on Windows"() { ... }
Care should be taken when ignoring feature methods in a spec class annotated with spock.lang.Stepwise since
later feature methods may depend on earlier feature methods having executed.
Requires
To execute a feature method under certain conditions, annotate it with spock.lang.Requires,
followed by a predicate:
@Requires({ os.windows })
def "I'll only run on Windows"() { ... }
Requires works exactly like IgnoreIf, except that the predicate is inverted. In general, it is preferable
to state the conditions under which a method gets executed, rather than the conditions under which it gets ignored.
PendingFeature
To indicate that the feature is not fully implemented yet and should not be reported as error, annotate it with spock.lang.PendingFeature.
The use case is to annotate tests that can not yet run but should already be committed.
The main difference to Ignore is that the test are executed, but test failures are ignored.
If the test passes without an error, then it will be reported as failure since the PendingFeature annotation should be removed.
This way the tests will become part of the normal tests instead of being ignored forever.
Groovy has the groovy.transform.NotYetImplemented annotation which is similar but behaves a differently.
-
it will mark failing tests as passed
-
if at least one iteration of a data-driven test passes it will be reported as error
PendingFeature:
-
it will mark failing tests as skipped
-
if at least one iteration of a data-driven test fails it will be reported as skipped
-
if every iteration of a data-driven test passes it will be reported as error
@PendingFeature
def "not implemented yet"() { ... }
Stepwise
To execute features in the order that they are declared, annotate a spec class with spock.lang.Stepwise:
@Stepwise
class RunInOrderSpec extends Specification {
  def "I run first"()  { ... }
  def "I run second"() { ... }
}
Stepwise only affects the class carrying the annotation; not sub or super classes. Features after the first
failure are skipped.
Stepwise does not override the behaviour of annotations such as Ignore, IgnoreRest, and IgnoreIf, so care
should be taken when ignoring feature methods in spec classes annotated with Stepwise.
Timeout
To fail a feature method, fixture, or class that exceeds a given execution duration, use spock.lang.Timeout,
followed by a duration, and optionally a time unit. The default time unit is seconds.
When applied to a feature method, the timeout is per execution of one iteration, excluding time spent in fixture methods:
@Timeout(5)
def "I fail if I run for more than five seconds"() { ... }

@Timeout(value = 100, unit = TimeUnit.MILLISECONDS)
def "I better be quick" { ... }
Applying Timeout to a spec class has the same effect as applying it to each feature that is not already annotated
with Timeout, excluding time spent in fixtures:
@Timeout(10)
class TimedSpec extends Specification {
  def "I fail after ten seconds"() { ... }
  def "Me too"() { ... }

  @Timeout(value = 250, unit = MILLISECONDS)
  def "I fail much faster"() { ... }
}
When applied to a fixture method, the timeout is per execution of the fixture method.
When a timeout is reported to the user, the stack trace shown reflects the execution stack of the test framework when the timeout was exceeded.
Retry
The @Retry extensions can be used for flaky integration tests, where remote systems can fail sometimes.
By default it retries an iteration 3 times with 0 delay if either an Exception or AssertionError has been thrown, all this is configurable.
In addition, an optional condition closure can be used to determine if a feature should be retried.
It also provides special support for data driven features, offering to either retry all iterations or just the failing ones.
class FlakyIntegrationSpec extends Specification {
  @Retry
  def retry3Times() { ... }

  @Retry(count = 5)
  def retry5Times() { ... }

  @Retry(exceptions=[IOException])
  def onlyRetryIOException() { ... }

  @Retry(condition = { failure.message.contains('foo') })
  def onlyRetryIfConditionOnFailureHolds() { ... }

  @Retry(condition = { instance.field != null })
  def onlyRetryIfConditionOnInstanceHolds() { ... }

  @Retry
  def retryFailingIterations() {
    ...
    where:
    data << sql.select()
  }

  @Retry(mode = Retry.Mode.FEATURE)
  def retryWholeFeature() {
    ...
    where:
    data << sql.select()
  }

  @Retry(delay = 1000)
  def retryAfter1000MsDelay() { ... }
}
Retries can also be applied to spec classes which has the same effect as applying it to each feature method that isn’t already annotated with {@code Retry}.
@Retry
class FlakyIntegrationSpec extends Specification {
  def "will be retried with config from class"() {
    ...
  }
  @Retry(count = 5)
  def "will be retried using its own config"() {
    ...
  }
}
A {@code @Retry} annotation that is declared on a spec class is applied to all features in all subclasses as well, unless a subclass declares its own annotation. If so, the retries defined in the subclass are applied to all feature methods declared in the subclass as well as inherited ones.
Given the following example, running FooIntegrationSpec will execute both inherited and foo with one retry.
Running BarIntegrationSpec will execute inherited and bar with two retries.
@Retry(count = 1)
abstract class AbstractIntegrationSpec extends Specification {
  def inherited() {
    ...
  }
}

class FooIntegrationSpec extends AbstractIntegrationSpec {
  def foo() {
    ...
  }
}

@Retry(count = 2)
class BarIntegrationSpec extends AbstractIntegrationSpec {
  def bar() {
    ...
  }
}
Check RetryFeatureExtensionSpec for more examples.
Use
To activate one or more Groovy categories within the scope of a feature method or spec, use spock.util.mop.Use:
class ListExtensions {
  static avg(List list) { list.sum() / list.size() }
}

class MySpec extends Specification {
  @Use(listExtensions)
  def "can use avg() method"() {
    expect:
    [1, 2, 3].avg() == 2
  }
}
This can be useful for stubbing of dynamic methods, which are usually provided by the runtime environment (e.g. Grails). It has no effect when applied to a helper method. However, when applied to a spec class, it will also affect its helper methods.
ConfineMetaClassChanges
To confine meta class changes to the scope of a feature method or spec class, use spock.util.mop.ConfineMetaClassChanges:
@Stepwise
class FooSpec extends Specification {
  @ConfineMetaClassChanges([String])
  def "I run first"() {
    when:
    String.metaClass.someMethod = { delegate }

    then:
    String.metaClass.hasMetaMethod('someMethod')
  }

  def "I run second"() {
    when:
    "Foo".someMethod()

    then:
    thrown(MissingMethodException)
  }
}
When applied to a spec class, the meta classes are restored to the state that they were in before setupSpec was executed,
after cleanupSpec is executed.
When applied to a feature method, the meta classes are restored to as they were after setup was executed,
before cleanup is executed.
|
Caution
|
Temporarily changing the meta classes is only safe when specs are run in a single thread per JVM. Even though many execution environments do limit themselves to one thread per JVM, keep in mind that Spock cannot enforce this. |
RestoreSystemProperties
Saves system properties before the annotated feature method (including any setup and cleanup methods) gets run, and restores them afterwards.
Applying this annotation to a spec class has the same effect as applying it to all its feature methods.
@RestoreSystemProperties
def "determines family based on os.name system property"() {
  given:
  System.setProperty('os.name', 'Windows 7')

  expect:
  OperatingSystem.current.family == OperatingSystem.Family.WINDOWS
}|
Caution
|
Temporarily changing the values of system properties is only safe when specs are run in a single thread per JVM. Even though many execution environments do limit themselves to one thread per JVM, keep in mind that Spock cannot enforce this. |
AutoAttach
Automatically attaches a detached mock to the current Specification. Use this if there is no direct framework
support available. Spring and Guice dependency injection is automatically handled by the
Spring Module and Guice Module respectively.
AutoCleanup
Automatically clean up a field or property at the end of its lifetime by using spock.lang.AutoCleanup.
By default, an object is cleaned up by invoking its parameterless close() method. If some other
method should be called instead, override the annotation’s value attribute:
// invoke foo.dispose()
@AutoCleanup("dispose")
def foo
If multiple fields or properties are annotated with AutoCleanup, their objects are cleaned up sequentially, in reverse
field/property declaration order, starting from the most derived class class and walking up the inheritance chain.
If a cleanup operation fails with an exception, the exception is reported by default, and cleanup proceeds with the next
annotated object. To prevent cleanup exceptions from being reported, override the annotation’s quiet attribute:
@AutoCleanup(quiet = true)
def ignoreMyExceptions
Title and Narrative
To attach a natural-language name to a spec, use spock.lang.Title:
@Title("This is easy to read")
class ThisIsHarderToReadSpec extends Specification {
  ...
}
Similarly, to attach a natural-language description to a spec, use spock.lang.Narrative:
@Narrative("""
As a user
I want foo
So that bar
""")
class GiveTheUserFooSpec() { ... }
See
To link to one or more references to external information related to a specification or feature, use spock.lang.See:
@See("http://spockframework.org/spec")
class MoreInformationAvailableSpec extends Specification {
  @See(["http://en.wikipedia.org/wiki/Levenshtein_distance", "http://www.levenshtein.net/"])
  def "Even more information is available on the feature"() { ... }
}
Issue
To indicate that a feature or spec relates to one or more issues in an external tracking system, use spock.lang.Issue:
@Issue("http://my.issues.org/FOO-1")
class MySpec {
  @Issue("http://my.issues.org/FOO-2")
  def "Foo should do bar"() { ... }

  @Issue(["http://my.issues.org/FOO-3", "http://my.issues.org/FOO-4"])
  def "I have two related issues"() { ... }
}
If you have a common prefix URL for all issues in a project, you can use the Spock Configuration File to set it up
for all at once. If it is set, it is prepended to the value of the @Issue annotation when building the URL.
If the issueNamePrefix is set, it is prepended to the value of the @Issue annotation when building the name for the
issue.
report {
    issueNamePrefix 'Bug '
    issueUrlPrefix 'http://my.issues.org/'
}
Subject
To indicate one or more subjects of a spec, use spock.lang.Subject:
@Subject([Foo, Bar]) { ... }Additionally, Subject can be applied to fields and local variables:
@Subject
Foo myFoo
Subject currently has only informational purposes.
Rule
Spock understands @org.junit.Rule annotations on non-@Shared instance fields. The according rules are run at the
iteration interception point in the Spock lifecycle. This means that the rules before-actions are done before the
execution of setup methods and the after-actions are done after the execution of cleanup methods.
ClassRule
Spock understands @org.junit.ClassRule annotations on @Shared fields. The according rules are run at the
specification interception point in the Spock lifecycle. This means that the rules before-actions are done before the
execution of setupSpec methods and the after-actions are done after the execution of cleanupSpec methods.
Include and Exclude
Spock is capable of including and excluding specifications according to their classes, super-classes and interfaces and according to annotations that are applied to the specification. Spock is also capable of including and excluding individual features according to annotations that are applied to the feature method. The configuration for what to include or exclude is done according to the Spock Configuration File section.
import some.pkg.Fast
import some.pkg.IntegrationSpec

runner {
  include Fast // could be either an annotation or a (base) class
  exclude {
    annotation some.pkg.Slow
    baseClass IntegrationSpec
  }
}
Optimize Run Order
Spock can remember which features last failed and how often successively and also how long a feature needed to be
tested. For successive runs Spock will then first run features that failed at last run and first features that failed
more often successively. Within the previously failed or non-failed features Spock will run the fastest tests first.
This behaviour can be enabled according to the Spock Configuration File section. The default value is false.
runner {
  optimizeRunOrder true
}
Report Log
Spock can create a report log of the executed tests in JSON format. This report contains also things like
@Title, @Narrative, @See and @Issue values or
block descriptors.
This report can be enabled according to the Spock Configuration File section. The default is to not generate this
report.
For the report to be generated, you have to enable it and set at least the logFileDir and logFileName. enabled can
also be set via the system property spock.logEnabled, logFileDir can also be set via the system property
spock.logFileDir and logFileName can also be set via the system property spock.logFileName.
If a logFileSuffix is set (or the system property spock.logFileSuffix), it is appended to the base filename,
separated by a dash. If the suffix contains the string #timestamp, this is replaced by the current date and time in
UTC automatically. If you instead want to have your local date and time, you can use the setting from the example
below.
report {
    enabled true
    logFileDir '.'
    logFileName 'spock-report.json'
    logFileSuffix new Date().format('yyyy-MM-dd_HH_mm_ss')
}
Third-Party Extensions
You can find a list of third-party extensions in the Spock Wiki.
Writing Custom Extensions
There are two types of extensions that can be created for usage with Spock. These are global extensions and annotation driven local extensions. For both extension types you implement a specific interface which defines some callback methods. In your implementation of those methods you can set up the magic of your extension, for example by adding interceptors to various interception points that are described below.
Which type of annotation you create depends on your use case. If you want to do something once during the Spock run - at the start or end - or want to apply something to all executed specifications without the user of the extension having to do anything besides including your extension in the classpath, then you should opt for a global extension. If you instead want to apply your magic only by choice of the user, then you should implement an annotation driven local extension.
Global Extensions
To create a global extension you need to create a class that implements the interface IGlobalExtension and put its
fully-qualified class name in a file META-INF/services/org.spockframework.runtime.extension.IGlobalExtension in the
class path. As soon as these two conditions are satisfied, the extension is automatically loaded and used when Spock is
running. For convenience there is also the class AbstractGlobalExtension, which provides empty implementations for all
methods in the interface, so that only the needed ones need to be overridden.
IGlobalExtension has the following three methods:
start()-
This is called once at the very start of the Spock execution.
visitSpec(SpecInfo spec)-
This is called once for each specification. In this method you can prepare a specification with your extension magic, like attaching interceptors to various interception points as described in the chapter Interceptors.
stop()-
This is called once at the very end of the Spock execution.
Annotation Driven Local Extensions
To create an annotation driven local extension you need to create a class that implements the interface
IAnnotationDrivenExtension. As type argument to the interface you need to supply an annotation class that has
@Retention set to RUNTIME, @Target set to one or more of FIELD, METHOD and TYPE - depending on where you
want your annotation to be applicable - and @ExtensionAnnotation applied, with the IAnnotationDrivenExtension class
as argument. Of course the annotation class can have some attributes with which the user can further configure the
behaviour of the extension for each annotation application. For convenience there is also the class
AbstractAnnotationDrivenExtension, which provides empty implementations for all methods in the interface, so that only
the needed ones need to be overridden.
Your annotation can be applied to a specification, a feature method, a fixture method or a field. On all other places
like helper methods or other places if the @Target is set accordingly, the annotation will be ignored and has no
effect other than being visible in the source code.
IAnnotationDrivenExtension has the following five methods, where in each you can prepare a specification with your
extension magic, like attaching interceptors to various interception points as described in the chapter
Interceptors:
visitSpecAnnotation(T annotation, SpecInfo spec)-
This is called once for each specification where the annotation is applied with the annotation instance as first parameter and the specification info object as second parameter.
visitFeatureAnnotation(T annotation, FeatureInfo feature)-
This is called once for each feature method where the annotation is applied with the annotation instance as first parameter and the feature info object as second parameter.
visitFixtureAnnotation(T annotation, MethodInfo fixtureMethod)-
This is called once for each fixture method where the annotation is applied with the annotation instance as first parameter and the fixture method info object as second parameter.
visitFieldAnnotation(T annotation, FieldInfo field)-
This is called once for each field where the annotation is applied with the annotation instance as first parameter and the field info object as second parameter.
visitSpec(SpecInfo spec)-
This is called once for each specification within which the annotation is applied to at least one of the supported places like defined above. It gets the specification info object as sole parameter. This method is called after all other methods of this interface for each applied annotation are processed.
Configuration Objects
You can add own sections in the Spock Configuration File for your extension by creating POJOs or POGOs that are
annotated with @ConfigurationObject and have a default constructor (either implicitly or explicitly). The argument to
the annotation is the name of the top-level section that is added to the Spock configuration file syntax. The default
values for the configuration options are defined in the class by initializing the fields at declaration time or in the
constructor. In the Spock configuration file those values can then be edited by the user of your extension.
|
Note
|
It is an error to have multiple configuration objects with the same name, so choose wisely if you pick one and probably prefix it with some package-like name to minimize the risk for name clashes with other extensions or the core Spock code. |
To use the values of the configuration object in your extension, just define an uninitialized instance field of that
type. Spock will then automatically create exactly one instance of the configuration object per Spock run, apply the
settings from the configuration file to it (before the start() methods of global extensions are called) and inject
that instance into the extension class instances.
A configuration object cannot be used exclusively in an annotation driven local extension, but it has to be used in at least one global extension to properly get initialized and populated with the settings from the configuration file. But if the configuration object is used in a global extension, you can also use it just fine in an annotation driven local extension. If the configuration object is only used in an annotation driven local extension, you will get an exception when then configuration object is to be injected into the extension and you will also get an error when the configuration file is evaluated and it contains the section, as the configuration object is not properly registered yet.
Interceptors
For applying the magic of your extension, there are various interception points, where you can attach interceptors from the extension methods described above to hook into the Spock lifecycle. For each interception point there can of course be multiple interceptors added by arbitrary Spock extensions (shipped or 3rd party). Their order is currently depending on the order they are added, but there should not be made any order assumptions within one interception point.
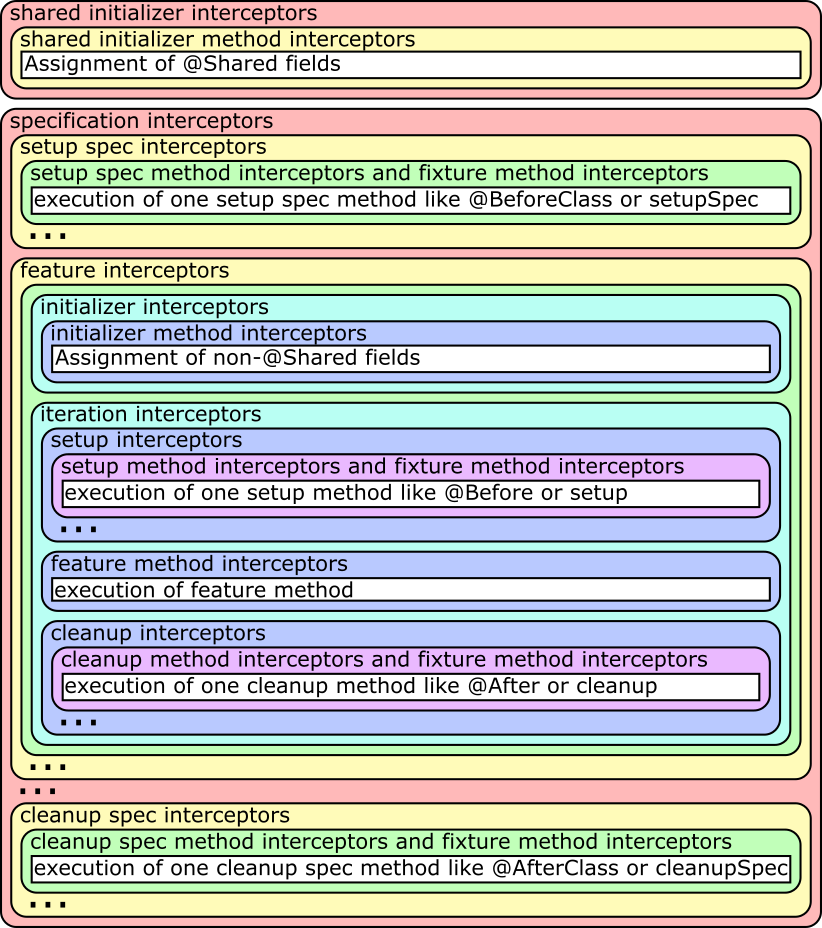
An ellipsis in the figure means that the block before it can be repeated an arbitrary amount of times.
The … method interceptors are of course only run if there are actual methods of this type to be executed (the white
boxes) and those can inject parameters to be given to the method that will be run.
The difference between shared initializer interceptor and shared initializer method interceptor and between initializer
interceptor and initializer method interceptor - as there can be at most one of those methods each - is, that there are
only the two methods if there are @Shared, respectively non-@Shared, fields that get values assigned at declaration
time. The compiler will put those initializations in a generated method and call it at the proper place in the
lifecycle. So if there are no such initializations, no method is generated and thus the method interceptor is never
called. The non-method interceptors are always called at the proper place in the lifecycle to do work that has to be
done at that time.
To create an interceptor to be attached to an interception point, you need to create a class that implements the
interface IMethodInterceptor. This interface has the sole method intercept(IMethodInvocation invocation). The
invocation parameter can be used to get and modify the current state of execution. Each interceptor must call the
method invocation.proceed(), which will go on in the lifecycle, except you really want to prevent further execution of
the nested elements like shown in the figure above. But this should be a very rare use case.
If you write an interceptor that can be used at different interception points and should do different work at different
interception points, there is also the convenience class AbstractMethodInterceptor, which you can extend and which
provides various methods for overriding that are called for the various interception points. Most of these methods have
a double meaning, like interceptSetupMethod which is called for the setup interceptor and the setup method
interceptor. If you attach your interceptor to both of them and need a differentiation, you can check for
invocation.method.reflection, which will be set in the method interceptor case and null otherwise. Alternatively you
can of course build two different interceptors or add a parameter to your interceptor and create two instances, telling
each at addition time whether it is attached to the method interceptor or the other one.
class I extends AbstractMethodInterceptor { I(def s) {} }

specInfo.addSharedInitializerInterceptor new I('shared initializer')
specInfo.sharedInitializerMethod?.addInterceptor new I('shared initializer method')
specInfo.addInterceptor new I('specification')
specInfo.addSetupSpecInterceptor new I('setup spec')
specInfo.setupSpecMethods*.addInterceptor new I('setup spec method')
specInfo.allFeatures*.addInterceptor new I('feature')
specInfo.addInitializerInterceptor new I('initializer')
specInfo.initializerMethod?.addInterceptor new I('initializer method')
specInfo.allFeatures*.addIterationInterceptor new I('iteration')
specInfo.addSetupInterceptor new I('setup')
specInfo.setupMethods*.addInterceptor new I('setup method')
specInfo.allFeatures*.featureMethod*.addInterceptor new I('feature method')
specInfo.addCleanupInterceptor new I('cleanup')
specInfo.cleanupMethods*.addInterceptor new I('cleanup method')
specInfo.addCleanupSpecInterceptor new I('cleanup spec')
specInfo.cleanupSpecMethods*.addInterceptor new I('cleanup spec method')
specInfo.allFixtureMethods*.addInterceptor new I('fixture method')
Injecting Method Parameters
If your interceptor should support custom method parameters for wrapped methods, this can be done by modifying
invocation.arguments. Two use cases for this would be a mocking framework that can inject method parameters that are
annotated with a special annotation or some test helper that injects objects of a specific type that are created and
prepared for usage automatically.
invocation.arguments may be an empty array or an array of arbitrary length, depending on what interceptors were run
before that maybe also have manipulated this array for parameter injection. So if you for example investigated the
method parameters with invocation.method.reflection.parameters and found that you want to inject the fifth parameter,
you should first check whether the arguments array is at least five elements long. If not, you should assign it a new
array that is at least five elements long and copy the contents of the old array into the new one. Then you can assign
your objects to be injected.
// create a map of all MyInjectable parameters with their parameter index
Map<Parameter, Integer> parameters = [:]
invocation.method.reflection.parameters.eachWithIndex { parameter, i ->
  parameters << [(parameter): i]
}
parameters = parameters.findAll { MyInjectable.equals it.key.type }

// enlarge arguments array if necessary
def lastMyInjectableParameterIndex = parameters*.value.max()
lastMyInjectableParameterIndex = lastMyInjectableParameterIndex == null ?
                                 0 :
                                 lastMyInjectableParameterIndex + 1
if(invocation.arguments.length < lastMyInjectableParameterIndex) {
  def newArguments = new Object[lastMyInjectableParameterIndex]
  System.arraycopy invocation.arguments, 0, newArguments, 0, invocation.arguments.length
  invocation.arguments = newArguments
}

parameters.each { parameter, i ->
  invocation.arguments[i] = new MyInjectable(parameter)
}|
Note
|
When using data driven features (methods with a
Data Driven Feature with Injected Parameter
|